Elan S4 being awakened after 35 year slumber.
The biggest problem with removing-inserting engine-gearbox combination is that the workshop manual was written before the gear lever got an anti sizzle connector!
So when you remove gear lever you are still left with the plastic dome and a short stub which catches on body work.
As soon as you realise that has to come off as well then everything 'flies out' - the main issue with having body on is getting a long enough reach crane. I had to drill an extra hole in my beam.
Not sure whether not having bodywork allows the stub to pass the arch in the "chassis"
They never seem to go back in as easily with the dreaded jam of bellhousing and engine mounts.
One seems to wiggle for ages and then it just goes past.
Anyway it's looking good now.
- MarkDa
- Coveted Fifth Gear

- Posts: 1215
- Joined: 15 Apr 2017
Thanks for the comments guys.
From the organised and ordered world of building up a new rolling chassis, I've now entered the world of the dark art....Elan electrics! Armed with a blown up colour copy of the wiring diagram, what could go wrong?
I thought I'd do the easy bit first by taking out the untidy mods carried out to install an alternator, and re-instate the good old voltage regulator and dynamo! The dynamo wires had been cut back to the loom, and a separate min-loom installed for the alternator. Luckily I had a spare tatty original S4 loom from which the required generator cables were pinched, along with the appropriate regulator connectors and long tails. A very satisfying job, and once the loom has been re-wrapped, it will look completely standard and original. I'm sure these alternator thingees will never catch on.
Next job was to start to take out the dash. It hasn't aged very well, and the wiring needed to be checked out to make sure it wasn't a potential bonfire site! Not a very difficult job, but it's a bit tight in there to get access to a couple of bits. Initial inspection shows the wires and connectors to be in very good condition, with no signs of over heating and no brittle cables.
Tomorrow's job will be to label up the wires before it all comes apart!
-

Elanintheforest - Coveted Fifth Gear

- Posts: 2938
- Joined: 04 Oct 2005
DJW wrote:How did I miss this thread.
Great to see you tinkering Mark and recognise a few of the other cars mentioned and in the background of photos
Now subscribed
Dave
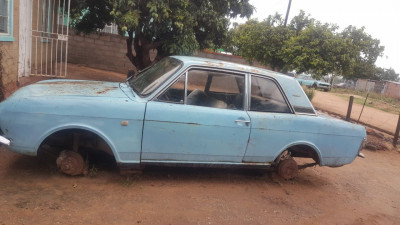
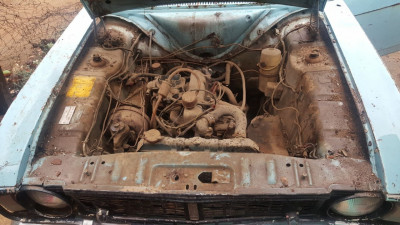
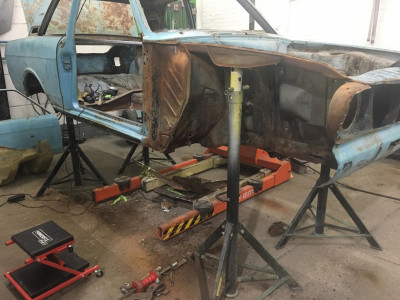
Tinkering for a couple of years now Dave. I got my Mojo back when I found a very rare Mk2 Cortina in Bulawayo, Zimbabwe, and had to get that brought over to be restored. Quite a challenge getting a car that had been scrapped in Africa back into fine fettle! I started on the Elan last year when I reached a quiet stage in the Cortina restoration. Of course, once the Elan was apart and spread out all over the place the Cortrina came back from the bodyshop ready for assembly...two cars completely apart kept me on my toes!
Here's what the Old Cortina looked, and now looks, like. Like Phoenix from the ashes!
-

Elanintheforest - Coveted Fifth Gear

- Posts: 2938
- Joined: 04 Oct 2005
Nice resto, Mark.
I feel the Tina will need windscreen wipers back here in the U.K., especially in your forest!
Tim
I feel the Tina will need windscreen wipers back here in the U.K., especially in your forest!
Tim
Visit www.lotuselansprint.com
-

trw99 - Coveted Fifth Gear

- Posts: 3269
- Joined: 31 Dec 2003
It will need a windscreen first Tim! Only just put the headlining in, hence the clips around the windscreen area. What a horrible job that is.
It's been a great contrast restoring the mass-produced Cortina vs the handbuilt Elan.The mass produced car was cheaper to buy in the first place, but far more expensive to restore than the handbuilt one, especially for the bodywork and trim. And the handbuilt car is easier to work on in many respects. Mind you, just starting the dashboard area on the Elan that view may yet change!
It's been a great contrast restoring the mass-produced Cortina vs the handbuilt Elan.The mass produced car was cheaper to buy in the first place, but far more expensive to restore than the handbuilt one, especially for the bodywork and trim. And the handbuilt car is easier to work on in many respects. Mind you, just starting the dashboard area on the Elan that view may yet change!
-

Elanintheforest - Coveted Fifth Gear

- Posts: 2938
- Joined: 04 Oct 2005
I’ve had a couple of good days on the Elan this week, stripping out the dash, labelling and drawing all the switch and instrument connectors and getting all the bits and pieces out of the engine bay.
When labelling up the switches, I always have to draw up the physical layout of that switch. If there are 4 cables going to the switch, which one goes where? Circuit diagrams are never very helpful here.
I’m really pleased with the condition of the wiring, with every cable connector being still bright brass colour and no signs of any overheating. Most importantly, nobody has botched up the wiring in the past, which is always a good thing.
The more I get to know this car (in detail!) the better it looks. I think it still has mostly original paint, although that is a long way from being perfect, with plenty of get-coat cracks and scrapes. But apart from a bit of touching up and a good cut and polish, that’s how it’s going to be. No worries about parking in the pub car park then! Properly painted bumpers and wheels, and a new hood, will get the old thing looking very smart.
The only blood letting today was courtesy of the bonnet opening cable. That should have been a nice easy thing to remove, but with the cable seized in the outer, it was not easy to get the two little catch-plates off. I was pushing and shoving to try and get a catch plate over the cable to get it off when it suddenly moved, revealing that the Bowden cable had about 4 broken strands. One of those went straight behind a finger nail more than quarter of an inch in…and that hurt!
As you can see from the photo, the dash has pretty well had it, so I’ll hunt out a new one next week. But I do have a question for those of you who have been here before….How the hec to you get the choke and heater cables out of the dashboard!? I’m sure there is a magic pin or something you press and everything pops out, but right now I can’t see it.
Next week is out with the transfer punches to get the chassis marked up for drilling and taping. Then the body goes back up on the beer crates, the chassis gets finished off with as many bits fitted as will fit under the shell! Whist the body is in the air, I’ll clean out the engine bay, so a couple of small fibreglass repairs and paint it.
Lots to do. Lots of time to do it in.
-

Elanintheforest - Coveted Fifth Gear

- Posts: 2938
- Joined: 04 Oct 2005
It wasn't too spectacular in Zimbabwe, Graeme! One of only 27 built, and with only 2 survivors, I had to restore it to the best standard I could manage.
You mention lots of penetrating oil on the cables, but on what? The cables move in and out of the outers OK, it's just that I can't figure out how to get the outers out of the dash. It's a bit like the cigar lighter, until you see the back of it and realise that the casing unscrews. There must be a secret way of getting these sodding things off!!
You mention lots of penetrating oil on the cables, but on what? The cables move in and out of the outers OK, it's just that I can't figure out how to get the outers out of the dash. It's a bit like the cigar lighter, until you see the back of it and realise that the casing unscrews. There must be a secret way of getting these sodding things off!!
-

Elanintheforest - Coveted Fifth Gear

- Posts: 2938
- Joined: 04 Oct 2005
Hi Mark,
removed Alternator to fit Generator,
nice one ☺
Alan
removed Alternator to fit Generator,
nice one ☺
Alan
Alan.b Brittany 1972 elan sprint fhc Lagoon Blue 0460E
- alan.barker
- Coveted Fifth Gear

- Posts: 3707
- Joined: 06 Dec 2008
Elanintheforest wrote:I’m really pleased with the condition of the wiring, with every cable connector being still bright brass colour and no signs of any overheating. Most importantly, nobody has botched up the wiring in the past, which is always a good thing.
Given that the wiring on the Elan is marginal at best, the number of posts about electrical problems on this forum and all the time, effort and expense you are putting into the car, I would show the loom the door and get a new one.
Even if the cabling in the cabin looks OK, the cabling in the engine bay will have deteriorated - heat and water play hell with a Lucas loom. The insulation hardens with age and heat and then tiny cracks form allowing water to enter and corrode the wire. The connections aren't water tight, and water wicks up the end of the cable from the connector, again corroding the cable and the connector itself. Replacing the connector is difficult as the corrosion can travel many cm up the cable as capillary action draws water up the cable.
Your call of course, but worth thinking about.
68 Elan S3 HSCC Roadsports spec
71 Elan Sprint (being restored)
32 Standard 12
Various modern stuff
71 Elan Sprint (being restored)
32 Standard 12
Various modern stuff
- Andy8421
- Coveted Fifth Gear

- Posts: 1178
- Joined: 27 Mar 2011
I've gone through the loom in the engine bay and now behind the dash and it's in superb condition, and I'm afraid to say, better than a few new looms I've used with other cars! I've had three new looms where several connectors were not attached to the cable correctly, and most connectors were a loose fit onto their switches. I also had one with a huge resistance on one cable, which went straight back to the manufacturer.
Like most things on cars I've found that OEM parts are far superior to modern replacements so long as they are in good condition. This Elan has been garaged all it's life, the same as my S3, and maybe that has helped preserve it. Neither car has had it's loom messed about with, exception being the crude modification to change the generator for an alternator on the S4, and that has now been rectified properly.
I'm much happier sticking with the OEM stuff that checks out with continuity and low resistance, so long as the plastic sheathing is still flexible and the connectors are clean.
I'd still like to know how to get the choke and heater cable outers off the dash though!!
-

Elanintheforest - Coveted Fifth Gear

- Posts: 2938
- Joined: 04 Oct 2005
Total Online:
Users browsing this forum: crannyr and 30 guests


