Page 4 of 14

Re: Elan S4 rebuild - my story chapter 2

PostPosted: Mon Nov 30, 2015 7:17 pm
by fattogatto
Every beer should take a lesson from this site. Marvelous.

Re: Elan S4 rebuild - my story chapter 2

PostPosted: Tue Dec 01, 2015 3:12 am
by Certified Lotus
pharriso wrote:Should not be a problem https://www.beermenus.com/beers/8111-marston-s-pedigree

One of my favorite beers as well... :D


Phil, I'm very impressed. And that's not easy to do with me :!:

Re: Elan S4 rebuild - my story chapter 2

PostPosted: Tue Dec 01, 2015 4:36 pm
by prezoom
Actually, somewhat depressing. The closest bottle seems to be in Cleveland. Back to my Arrogant Bastard Ale.

Re: Elan S4 rebuild - my story chapter 2

PostPosted: Sun Dec 06, 2015 11:41 pm
by Certified Lotus
Todays plan was to get the freeze plugs installed and the engine back in the Elan.

Fired up the propane heater at 6am to preheat the garage and Drew showed up at 7am sharp. We talked about world events (depressing) and our professional lives to catch up since last week and then focused on the objective at hand.......

The block openings were scraped and then cleaned with lacquer thinner with Dow Corning high temp sealant applied before the plugs where installed. All went according to plan with all the plugs both in the block as well as the head. .

dsc07177.jpg and
Clean block freeze plug openings

dsc07185.jpg and
Adding high temp sealant

dsc07184.jpg and
Plug Installed in block

dsc07193.jpg and
Dropping Engine in


Of course the engine didn't quite line up right away with the trans input shaft. That took a couple of hours to finesse to get just right.

dsc07197.jpg and
Trans adjustment to line up Twink


Once the TC was installed and bolted up, we focused on all the parts that need to be re-attached to the engine.

dsc07205.jpg and
Installed and finishing the details


Drew had bead blasted the SOVY can during the week and found pin holes in the can. He soldered the holes and then cadmium plated the can. Looks great and is installed with the new cap.

dsc07206.jpg and
SOVY can bead blasted, holes soldered and cadmium plated


After Drew left I worked on the Elan for a few more hours. It was a two Ale day :)

dsc07203.jpg and
Two ale day!

Re: Elan S4 rebuild - my story chapter 2

PostPosted: Mon Dec 07, 2015 12:05 am
by pharriso
Certified Lotus wrote:Drew had bead blasted the SOVY can during the week and found pin holes in the can. He soldered the holes and then cadmium plated the can. Looks great and is installed with the new cap.

DSC07206.jpg


So you now have my repaired SOVY can & I have TerryP's :D

Well done, you're making good progress!

Re: Elan S4 rebuild - my story chapter 2

PostPosted: Mon Dec 07, 2015 12:44 am
by Certified Lotus
Phil, greatly appreciate your SOVY can! I wanted to restore this S4 to as close to OEM as possible. Everything is coming togther nicely. This will be a great Elan when I'm done :D

Re: Elan S4 rebuild - my story chapter 2

PostPosted: Sun Dec 13, 2015 11:42 pm
by Certified Lotus
I'm at the point that the details are important. You know, this little things that get looked over because your excited to get the Elan back on the road. And some of them take some major thinking and redoing.

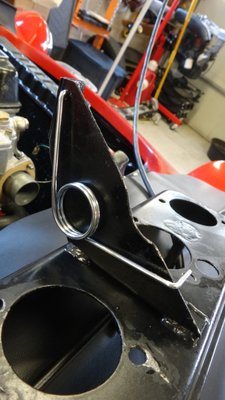
I decided that I was going to keep this car as close to stock as possible. So one of the major issues was the air box with the weber carb/throttle return spring. Despite wanting to keep this car as close to stock as possible, I refuse to install rubber fuel line. Only braided fuel line and aluminum fittings are used on any of my cars. The braided fuel line requires some extra clearance so a portion of the air box bracket is ground out in a curve to make plenty of room for the fuel line without rubbing.
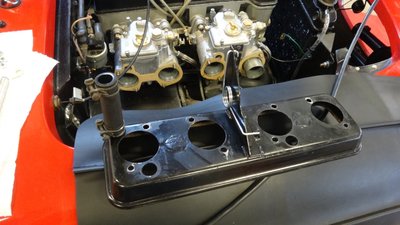
dsc07268.jpg and
Air box back plate

dsc07270.jpg and
Air box bracket with ground out area for fuel line


I had ordered a new throttle return spring and of course the size of the spring diameter and the holes in the air box bracket and the weber throttle control were all different. That meant removing everything I had just installed and drilling out the holes so the spring would fit. Hours of labor, thank goodness my friend Drew is here to help as no short cuts for me.
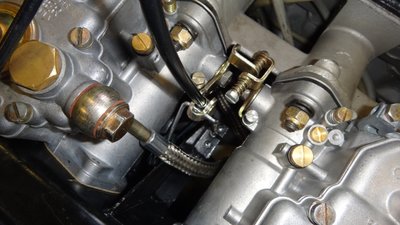
dsc07279.jpg and
Throttle return Spring


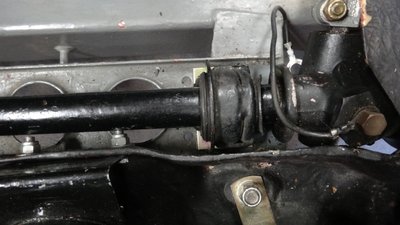
Another thing I notice while the radiator was out (I had it professional cleaned out and pressure tested) was the steering rack brackets seemed cocked. When I dismantled the brackets I noticed the shims were not correct for this car so I ordered new one and installed them on both sides.
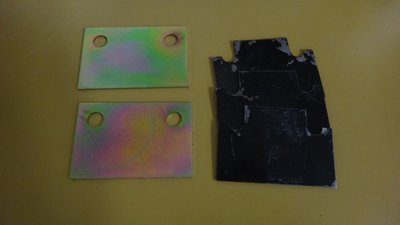
dsc07261.jpg and
Steering Rack Shims

dsc07264.jpg and
Steering rack with new shims installed


I went about draining the transmission and differential oil and replaced both. Drew worked on replacing all the vacuum lines for the headlights. I had ordered all the correct parts from RD Enterprises so we were well prepared.
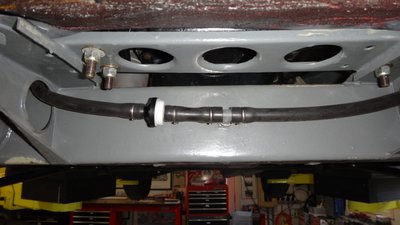
dsc07280.jpg and
Headlight vacuum line and valve install


Finished installing the radiator, hoses and all the brackets for the cooling system. Filled with anti corrosion anti-freeze.
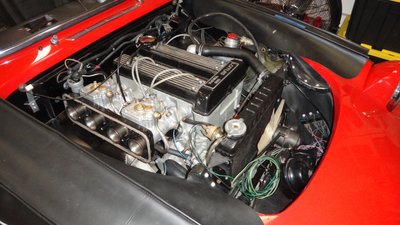
dsc07284.jpg and
Elan S4 Engine bay


Installed the rebuilt starter motor and the generator. Replaced the bolts, nuts, washers with grade 8.

Installed a few new grommets in the engine bay (the old ones were dried out and cracked).

Bolted the exhaust system back in and lowered the car onto the ground calling it a day. We didn't get as much done as anticipated. People kept stopping by to see what was going on as the word is out we are restoring Lotus sports cars in my garage. It was also a 62 degree F day in mid-December and the weather is bringing everyone out !

Next week is tracing out all the wiring in the electrical system. No idea how long that will take, but I'm well prepared......I had a copy of the wiring diagram made 4 times larger than normal so tracing all the circuits would be easy :)

Re: Elan S4 rebuild - my story chapter 2

PostPosted: Mon Dec 14, 2015 12:25 am
by seniorchristo
No doubt the person buying this Elan will be getting a quality product!
Good job Glen (and Drew)! :)

Re: Elan S4 rebuild - my story chapter 2

PostPosted: Mon Dec 14, 2015 12:31 pm
by Certified Lotus
Thanks Chris. We are very focused on getting it right. When we are done it will be a great road car for a Lotus Elan aficionado who wants to drive the car and not restore it. Of course, it's a Lotus so there will always be some thinkering to be done along the way :D

Re: Elan S4 rebuild - my story chapter 2

PostPosted: Wed Dec 16, 2015 7:02 pm
by pharriso
Certified Lotus wrote:John, I don't think I have ever had Marstons Pedigree. Will need to see if I can find it here in the States. Thanks for the recommendation! I like keep the garage fridge full of interesting ales to enjoy after a long day of Lotus work 8)

Update: I went to three different liquor stores that stock hundreds of beers and ales from around the world. No one carries Marstons. Unfortunate. Now I have to wonder what I am missing :?


I had one in your honour this weekend:
img_3683.jpg and


Glad to report still superb!

Looks like the work is progressing really well!

Re: Elan S4 rebuild - my story chapter 2

PostPosted: Thu Dec 17, 2015 1:35 am
by Certified Lotus
That's tempting Phil. I need to get to the beer store you located for me to get a case of my own. Just need to find the time to drive 28 miles each way.

Maybe it will add some motivation to get done by New Year............

Re: Elan S4 rebuild - my story chapter 2

PostPosted: Mon Dec 21, 2015 1:30 am
by Certified Lotus
OK, first the important stuff. John, thanks for introducing me to Marstons Pedigree ale and Phil thanks for finding the closest location to me to purchase it! I made the 2 hour round trip early Saturday morning and I can tell you from my tasting late this afternoon it was well worth it!!!

dsc07351.jpg and
Marstons Pedigree Ale


Today was scheduled to be electrical wiring tracing gremlin day. I had already made a large copy of the wiring schematic to trace every wire and test them. Drew and I pulled the dash out as far as we could, removing the oil pressure line, speedometer cable and the stick shift. We put a blanket down underneath the dash so it would not get scratched and Drew was armed with an ohm meter, test light and flashlight while I read the wiring schematic as we traced wires and tested for continuity as a team. It was laborious and required a bit of sleuthing as not all the wires were color coded appropriately. Over all we got through most of it with only a couple of head scratching moments where we need to come back and decide on some solutions.

dsc07332.jpg and
Drew in the drivers seat tracing wiring

dsc07345.jpg and
Large wiring diagram so much easier to read


One of the things we cant figure out is the connection block attached to the headlight vacuum switch. I cant seem to find this in any documentation. Can anyone provide some insight to this?

dsc07330.jpg and
Vacuum switch connection block


Chris came over to use my parts cleaning tank as he is disassembling a differential to rebuild for his S4. We later got into the finer points of discussing what parts should be replaced while the diff is apart.

dsc07333.jpg and
Chris cleaning parts

dsc07342.jpg and
Looking for trouble


My wife and oldest son Ryan came out in the garage to see what we were up to. Ryan stuck around as he realized he could learn something from the "old guys" about reading a wiring schematic and tracing wiring. Ellen just made a rare appearance in the garage to see what we were up to and were we ever going to finish this project :roll:

dsc07347.jpg and
Supervisors


Half day today. Drew, Ryan and I went to a garage in the next town that is going out of business to buy some used equipment. Early Christmas for me :D

Well, I've got a case of Marstons Pedigree in the garage fridge and some great friends and a wonderful family. And two Elan's in the garage. Life is good!

Merry Christmas everyone!

Re: Elan S4 rebuild - my story chapter 2

PostPosted: Mon Dec 21, 2015 8:34 am
by Almondgreen
Very nice job and clean engine bay. You don't have any clearance problem when opening the hood with the engine fan ?

Re: Elan S4 rebuild - my story chapter 2

PostPosted: Mon Dec 21, 2015 11:33 am
by Certified Lotus
That is a good question Almondgreen. I have never had the bonnet on the car. It was delivered with it off as this bonnet does not have the bulge for the carbs on it, it's flat. I know it's never been fitted so I guess I will find out. I had just assumed the fan layout was from a Sprint.

Re: Elan S4 rebuild - my story chapter 2

PostPosted: Mon Dec 21, 2015 11:38 am
by rgh0
Almondgreen wrote:Very nice job and clean engine bay. You don't have any clearance problem when opening the hood with the engine fan ?


The fan installation looks like the standard Lotus installation in terms of motor and bracket though the fan blades look different from what was fitted to my 73 Pus 2. But maybe the blades changed over time.

cheers
Rohan