
Elan S4 rebuild - my story chapter 2

![]() Post by: john.p.clegg » Wed Mar 16, 2016 4:48 pm
Post by: john.p.clegg » Wed Mar 16, 2016 4:48 pm
John
-

john.p.clegg - Coveted Fifth Gear

- Posts: 5744
- Joined: 21 Sep 2003

![]() Post by: billwill » Wed Mar 16, 2016 6:23 pm
Post by: billwill » Wed Mar 16, 2016 6:23 pm
Certified Lotus wrote:Thanks for all your responses on the glove box lock. One more question, is the key for the glovebox lock a separate key from the ignition or the door?
I think that originally the same key fitted the boot and the glove box; ignition+doors was a different key.
That's what you would want when you entrust the hotel parking employee to put your car in the hotel garage.
~~~~~~~~~~~~~~~
LONG AGO I changed the barrels on my door locks for double-sided keys normally used in security filing cabinets (from RadioSpares -- Farnell) These were splendid because the police do not have these keys on their big bunches of keys and on at least one occasion allowed me to rescue my car from them before they impounded it for overstaying my parking time.
36/6725 S3 Coupe OGU108E Yellow over Black.
- billwill
- Coveted Fifth Gear
- Posts: 5062
- Joined: 19 Apr 2008
![]() Post by: Certified Lotus » Wed Mar 16, 2016 8:31 pm
Post by: Certified Lotus » Wed Mar 16, 2016 8:31 pm
Went to this small shop in Trenton NJ that has been in the same place for 30 years. Nice guy who said he can fix or repair anything mechanical. Not good with computers or electronics.
I showed him my glove box lock and the two keys I had that came with it that won't open the lock. Took them into his shop and 2 minutes later said, these aren't the right keys, got anymore? Nope. That is what I have. He said he could cut a new one from his stock (was for a Fiat) and would be able to cut one of the old ones to fit. 10 minutes later and $25 poorer I had a glove box lock and keys that work.

- 69 Lotus Elan glove box lock & keys

05 Elise - Back where I started
65 Elan S2 - 26/4055
72 Europa - 74/2358R
69 Elan S4 - 45/7941
64 Elan S1 - 26/0379
12 Colin 30 - Lotus Racing Kart
07 Exige S - Wicked Road/Track Car
07 Exige S - Fast Road/Track Car
06 Elise - Track pack
-

Certified Lotus - Coveted Fifth Gear
- Posts: 1233
- Joined: 04 Aug 2014
![]() Post by: Certified Lotus » Sun Apr 03, 2016 11:10 pm
Post by: Certified Lotus » Sun Apr 03, 2016 11:10 pm
Drew and I had planned working on the car today a couple of weeks ago so we had our schedule set. I woke up this morning to 50mph+ winds howling outside and the power flickering off and on. Well I thought, this will make it interesting. I expected many trees down as it had been raining so I had low expectations the day would turn out as I was hoping. Luckily I only had small tree limbs come down, nothing major.
Drew and I went thru the "items to be done list" I had written a couple of weeks ago so we wouldn't forget. Top of the list was re-installing the rebuilt generator and lowering the radiator mounts.
The generator needed rebuilding as it wasn't charging the battery. We had a company that specializes in this rebuild it. The install was easy.

- Rebuilt Generator

Next was the lowering of the radiator. When we tried the installation of the bonnet a couple of weeks ago it was apparent the radiator was sitting too high and the radiator cap was preventing the bonnet from closing. We loosened some bolts on the brackets and adjusted the radiator making sure it was level. Placed the bonnet back on and everything fit perfectly.
I had the glove box lock rekeyed so I reinstalled the lock. All worked fine. The bracket that holds the clasp catch for the door will come next, but I media blasted it and started to paint it black so I'll install next week.

- Glove box lock install

Needed to install the tie rod boots as they had been eaten away by mice when the car was in storage. Removed the tie rods, made sure they were packed with grease and installed the boots.

- Tie Rod boot right side


- Tie Rod boot left side

During the test drive a couple of weeks ago it was apparent the clutch needed a bit of adjustment. I had thought we should bleed the master cylinder and slave. Drew wanted to look inside the bell housing first. Guess what? The main spring for the throw our bearing arm had come off. We both wondered how that had happened as we had installed a new one. Drew thought he could reattach it inside the bell housing........I was planning on another engine removal. I've got to say, Drew doesn't give up easy. I had a fiber optic flashlight so he could work through the opening in the bell housing and we fabricated some tools from long screw drivers that we cut and bent with a torch. After many tries and some not so nice words, success!

- Throw out bearing arm spring attachment

Gotta hand it to Drew, he persevered and it paid off!
We moved to the front of the car and decided to tackle the fiberglass repair that we had been ignoring during the entire rebuild. When I bought the car there was a small hole in the lower left bottom cowl of the car. I knew this was not a bondo job so I purchased a fiberglass repair kit. As in all fiberglass repairs, the prep of the area is the key to success (I have owned a number of fiberglass sailboats boats in my life, I know what I'm in store for with this repair). We masked and wet sanded the area down, outside and inside the area. Will leave it to dry until next week and then start the fiberglass repair for this area.

- Small hole to be repaired


- Preparing small hole repair


- Small hole sanded down to fiberglass

Our friend Ed came over to see what we were up to. He has been following the posts and is the midst of finishing up work with a friend of his on a yellow '68 Elan Coupe that is for sale. We discussed all things Elan while Ed inspected our work (a number of times). I think he was impressed with our Elan and the detail of the work done, at least he said so
Drew and I agreed on next weekends objectives and we believe we are getting very close to completion. Great! Spring is here and sports car driving season is almost upon us !
This car will be for sale in a couple of weeks. If your interested let me know.
05 Elise - Back where I started
65 Elan S2 - 26/4055
72 Europa - 74/2358R
69 Elan S4 - 45/7941
64 Elan S1 - 26/0379
12 Colin 30 - Lotus Racing Kart
07 Exige S - Wicked Road/Track Car
07 Exige S - Fast Road/Track Car
06 Elise - Track pack
-
Certified Lotus - Coveted Fifth Gear
- Posts: 1233
- Joined: 04 Aug 2014
![]() Post by: Certified Lotus » Sun Apr 10, 2016 11:41 pm
Post by: Certified Lotus » Sun Apr 10, 2016 11:41 pm
First on our list was to complete the fiberglass repair of the hole on the lower front cowl. Not a big deal, mixed up the resin and hardener, brushed it on the sanded area inside the car, soaked the fiberglass and applied two small sheets and squeegeed the air bubbles out. Let dry for the day.

- Preparing Fiberglass resin mix


- Applying resin to inside of body


- Fiber Glass Patch curing

Next Drew and I moved to some interior work. The drivers side interior door lock never functioned as it was missing the rod (I found a bent up one in the box of parts that came with the car) and a number of the special clasps were either missing or broken so the parts I had ordered from RD Enterprises (Thanks Ray!) all came in handy to complete the install. Naturally Drew spent a considerable amount of time to ensure everything functioned perfectly.

- Installing door lock rod

I went about installing the rare corner clasp that the pin from the glovebox door attaches to. Normally this would be done when the dash was out, but I didn't know I was missing the part until after the dash was back in. I did not want to pull the dash out again, so I worked on this from under the dash and on the floor. What should have taken 10 minutes took almost 2 hours, but the end result is spot on and it works very well.

- Installed glove box door catch

We had agreed a full hydraulic system bleed one more time to flush out any residue and make sure the clutch and brakes all worked according to spec. We also changed the engine oil and filter. The car now has all new fluids everywhere. Just as it should be.
 / dsc07889.jpg")
- Bleeding brakes and clutch (again)
 / dsc07889.jpg")
The list should be getting smaller, but Drew and I keep adding small little detail things to finish it up. Our next day working on the car is to complete the fiberglass patch, install the drivers interior door panel, install the bonnet, figure out why the horn and tach don't work and go on a longer shake down drive (weather dependent).
The last thing to do is paint touch up, buffing, bumper & emblem install and put the soft top on the car.
Then it's ready for sale! Who ever gets this car will have one sweet ride. It's a real time capsule having spent almost 30 years in a garage under restoration.
05 Elise - Back where I started
65 Elan S2 - 26/4055
72 Europa - 74/2358R
69 Elan S4 - 45/7941
64 Elan S1 - 26/0379
12 Colin 30 - Lotus Racing Kart
07 Exige S - Wicked Road/Track Car
07 Exige S - Fast Road/Track Car
06 Elise - Track pack
-
Certified Lotus - Coveted Fifth Gear
- Posts: 1233
- Joined: 04 Aug 2014
![]() Post by: Certified Lotus » Sun Apr 17, 2016 1:06 pm
Post by: Certified Lotus » Sun Apr 17, 2016 1:06 pm
Our list of things to be completed today include installing drivers side interior door card, completing the patch on the front cowl, installing the airbox and trunking, installing the bonnet with spring and hopefully going for a test drive.
Drew worked on the door card and found that the arrangement of all the clips to have a nice install was more complicated then it should be. I had ordered many spares of the clips and the plastic grommets to receive them so we changed everything out. It took a while to get everything perfect, but it got done.

- Drew installing door card

While Drew was deep into the fitting of the door card I was in the midst of installing the airbox and trunking. This car came with an airbox and it looked to be the correct one for an S4 and or Sprint. Or so I thought.......

- Airbox that came with car

After getting the airbox bolted in and the trunking nicely installed I placed the bonnet on the car and tried to close the bonnet. That would be a negative. The airbox prevented the bonnet from closing as it was too wide at the inlet of the box.

- Airbox too wide

Now I have been down this path before with my S1 and I have collected a full range of airboxes over the last year so I brought them all out.......I had five complete sets of airboxes and backing plates for a Lotus Elan. After careful measuring I choose the one that I though should fit and installed it.

- Alternate airbox design installed

The next project was finishing the patch on the bottom of the cowl. Drew mixed up some filler and applied a couple of thin coats letting it cure and sanding down between each application. Got it to a point where priming was ready to be done.

- Prepping for filler coat


- Fiberglass patch before filler coat


- Completed patch with sanded filler coat

Our friend Chris came over with his Elan to see what we were up to and to show us his newest Elan tool, a color tune. We had never seen one before and Chris went about tuning his engine showing us how it worked. Pretty ingenious device! I'll need to get one of those!

- Chris tuning his twin cam


- Color Tune Device


- Chris explaining to Drew how it works

I had been trickle charging the battery all week as we had anticipated going for a longer shakedown drive to test the car out. No such luck. It wouldn't start! A quick check of the distributor showed the points had fused. How did that happen? I didn't have a spare set of points (new order from R&D on its way) so no road test this weekend.
The good news is the completion list is very small and I'm really focused on the paint touch up now so we can get the bumpers on and the badge plates to complete the Elan. Need to get the paint guy over soon!
05 Elise - Back where I started
65 Elan S2 - 26/4055
72 Europa - 74/2358R
69 Elan S4 - 45/7941
64 Elan S1 - 26/0379
12 Colin 30 - Lotus Racing Kart
07 Exige S - Wicked Road/Track Car
07 Exige S - Fast Road/Track Car
06 Elise - Track pack
-
Certified Lotus - Coveted Fifth Gear
- Posts: 1233
- Joined: 04 Aug 2014
![]() Post by: billwill » Sun Apr 17, 2016 1:16 pm
Post by: billwill » Sun Apr 17, 2016 1:16 pm
For anyone else who does not know, it is a spark plug with a transparent quartz top, through which you can literally SEE the colour of the flame in the combustion chamber. Used when setting fuel/air settings on the carb.
Blue with light orange freckles is usually considered the correct fuel/air mix.
36/6725 S3 Coupe OGU108E Yellow over Black.
- billwill
- Coveted Fifth Gear
- Posts: 5062
- Joined: 19 Apr 2008
![]() Post by: seniorchristo » Sun Apr 17, 2016 6:39 pm
Post by: seniorchristo » Sun Apr 17, 2016 6:39 pm
- Attachments
-

- Glen and Drew ponder a sputtering S1

67 Elan +2
- seniorchristo
- Fourth Gear

- Posts: 618
- Joined: 19 Dec 2013
![]() Post by: Certified Lotus » Sun Apr 17, 2016 11:55 pm
Post by: Certified Lotus » Sun Apr 17, 2016 11:55 pm
billwill wrote:I'm amazed that with all your expeience you only just found out about the ColourTune. :shock
Hi Bill, I've heard and read about color tune for years but never bought one. I'm old school having learned to tune by listening and measuring the carbs suction. Always worked for me, but I'm impressed with what I saw and will get one for future use.
Chris, will have both cars running the next time you come over and we will have a nice drive thru the hills of NJ
05 Elise - Back where I started
65 Elan S2 - 26/4055
72 Europa - 74/2358R
69 Elan S4 - 45/7941
64 Elan S1 - 26/0379
12 Colin 30 - Lotus Racing Kart
07 Exige S - Wicked Road/Track Car
07 Exige S - Fast Road/Track Car
06 Elise - Track pack
-
Certified Lotus - Coveted Fifth Gear
- Posts: 1233
- Joined: 04 Aug 2014
![]() Post by: tedtaylor » Thu Apr 21, 2016 11:59 pm
Post by: tedtaylor » Thu Apr 21, 2016 11:59 pm
"Driving a Lotus is a triumph of bravery over intelligence." Stirling Moss
"TaylorMadeClassicCars" on WWW and Facebook
- tedtaylor
- Fourth Gear
- Posts: 608
- Joined: 09 Dec 2012
![]() Post by: Certified Lotus » Fri Apr 22, 2016 12:12 am
Post by: Certified Lotus » Fri Apr 22, 2016 12:12 am
tedtaylor wrote:Glen, you collected a full range of airboxes, but didn't have a spare set of points???
Embarrassing isn't it? I've got two engines with electronic distributors so no reall need for points. Or so I thought
05 Elise - Back where I started
65 Elan S2 - 26/4055
72 Europa - 74/2358R
69 Elan S4 - 45/7941
64 Elan S1 - 26/0379
12 Colin 30 - Lotus Racing Kart
07 Exige S - Wicked Road/Track Car
07 Exige S - Fast Road/Track Car
06 Elise - Track pack
-
Certified Lotus - Coveted Fifth Gear
- Posts: 1233
- Joined: 04 Aug 2014
![]() Post by: Certified Lotus » Mon Apr 25, 2016 12:29 pm
Post by: Certified Lotus » Mon Apr 25, 2016 12:29 pm
The order of priority was to install the new points in the distributor. I had read that this can be done with the weber carb in place, but Drew and I didn't want to work blindly on this and removed the airbox, front weber carb and then the point plate inside the distributor. Yup, the points were completely fried. Replaced them and the condenser, reinstalled, set the gap and reattached the weber carb and airbox.

- Removing weber and airbox


- Old points and condenser


- Distributor in place with weber carb removed


- New points and condenser


- Weber Carb reinstalled and airbox back in place

The engine started right up and we went for a test drive. It's running great but want to adjust the clutch a bit more as its engaging just inches off the floor.

- Engine running smoothly and test drive

The tach needs to be dealt with as its not working and we also noticed the battery is still not charging as the ignition light stays on. Will order a new voltage regulator.

- Tach removal

While we were trying to figure out what was wrong with the tach, a friend of Drew's who lives down the street from me stopped over to see what we were up to. Arnold's Jag is a very cool machine. He did all the right modifications to make it a unique coupe.

- Arnold and his very cool Jag

Back to the tach, we could not figure out what was wrong. Maybe the voltage stabilizer is bad and needs replacement. I've ordered a new one (the old wiring had a lot to be desired and it might have shorted everything out). If anyone has an suggestions or can confirm that the tach in the photos is actually for an S4 any info would be greatly appreciated!

- Back of tach


- Front of tach

We stopped working on the S4 after lunch and moved to the S1 to give it its spring tune up, oil & filter change and install of new high capacity airbox I had received from the UK. That is another story and will post it on my S1 rebuild post.
As usual, waiting for parts to complete the S4. Now I just need the painter to come over and look at the car.
05 Elise - Back where I started
65 Elan S2 - 26/4055
72 Europa - 74/2358R
69 Elan S4 - 45/7941
64 Elan S1 - 26/0379
12 Colin 30 - Lotus Racing Kart
07 Exige S - Wicked Road/Track Car
07 Exige S - Fast Road/Track Car
06 Elise - Track pack
-
Certified Lotus - Coveted Fifth Gear
- Posts: 1233
- Joined: 04 Aug 2014
![]() Post by: billwill » Mon Apr 25, 2016 12:40 pm
Post by: billwill » Mon Apr 25, 2016 12:40 pm
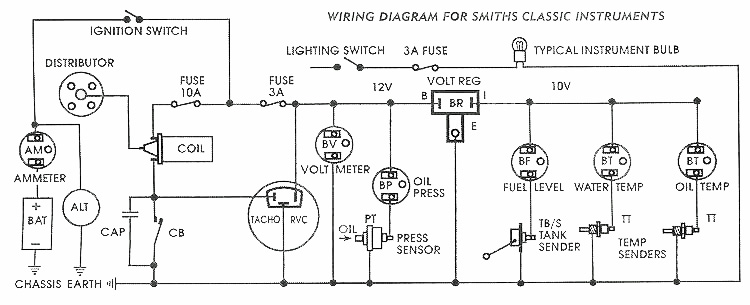
If you fed the power of the tacho from that switching regulator the interrupted supply would thoroughly confuse the tacho.
The tacho has its own stabalizing circuit inside.
The above smiths circuit shows a voltage-sensing tacho (RVC). Yours is a current sensing tacho (RVI). The effective parts of the circuit are very simple.

The sensing loop in this diagram is inside yout tacho and so the white wire to the ignition coil is split at the tacho with (I understand) a male and a female bullet connector so that the white wire can be routed throught the sensing coil inside the tacho.
36/6725 S3 Coupe OGU108E Yellow over Black.
- billwill
- Coveted Fifth Gear
- Posts: 5062
- Joined: 19 Apr 2008
![]() Post by: billwill » Mon Apr 25, 2016 12:58 pm
Post by: billwill » Mon Apr 25, 2016 12:58 pm
That case has to be earthed for the tacho to work.
The regulator is, for convenience, fastened on with one of the tacho mounting bolts and consequently shares the earth. The power feed to the tacho is, for convenience, taken from a double connector on the 12V INPUT side of the regulator (not the switching 10v output).
36/6725 S3 Coupe OGU108E Yellow over Black.
- billwill
- Coveted Fifth Gear
- Posts: 5062
- Joined: 19 Apr 2008
Total Online:
Users browsing this forum: No registered users and 38 guests