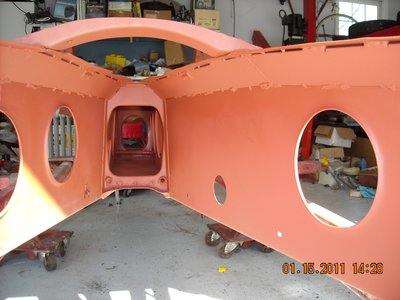
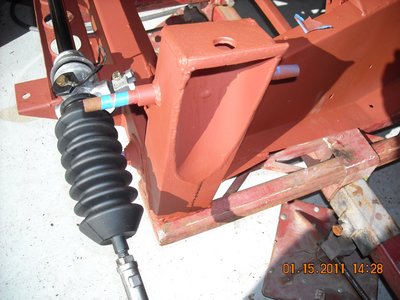
The restoration of 45/7286
My frame was in much worse condition than that. After sandblasting it I brought it down to Steve Smith of Twincam Sports Cars in Sarasota, Florida. Steve is a great technician and a long time Lotus racer. I addition to being a decent welder and fabricator, he has a jig to perform Elan Frame repairs. He performed the repairs on my frame which include rebuilding the entire left front turret and upgrading the frame to 26R specs. Not cheap but fair.
Frank
Frank
Famous Frank
67 Elan Coupe
66 Elan S2 SE
65 Elan S2
65 Elan 26R
69 S2 Europa
06 Elise
67 Barracuda
67 Elan Coupe
66 Elan S2 SE
65 Elan S2
65 Elan 26R
69 S2 Europa
06 Elise
67 Barracuda
-

Famous Frank - Fourth Gear

- Posts: 556
- Joined: 29 Apr 2004
Thought I would post what I have been working on. I have cleaned up and refinished some of the front and rear suspension pieces. I used gloss black Rust Seal for the front control arms. It seems to match the factory gloss well. I used Satin black Rust Seal for the front hubs, front steering arms, brake shields and rear control arms. It looks good but is glossier than the original finish. I used Rust-oleum hunter green and regal red to mark the left and right hand components. Both colors were very close to the original colors.
I used Zero Rust in red for the rear hubs. It seems to match the original color very well.
I also replaced the bushings in the control arms with new factory style bushings.
I used Zero Rust in red for the rear hubs. It seems to match the original color very well.
I also replaced the bushings in the control arms with new factory style bushings.
- rcombs
- Second Gear

- Posts: 146
- Joined: 14 Jun 2013
I also got the frame back from the blasters. No new rust areas showed up, so that is a good thing. I found the serial number 45/7286 stamped on top of the right front side next to the engine.
I also found the number 26A701stamped on top of the center section just back of the front Y. I assume that is the frame number from the original manufacturer, but don't really know.
I also found the number 26A701stamped on top of the center section just back of the front Y. I assume that is the frame number from the original manufacturer, but don't really know.
- rcombs
- Second Gear

- Posts: 146
- Joined: 14 Jun 2013
Well, it's been about two months since I last posted. I had about 3 weekends that I didn't get much done due to colds and other stuff. I have been working on getting the frame ready to prime. I have been cutting out the rust and welding in new metal along the sides.
- rcombs
- Second Gear

- Posts: 146
- Joined: 14 Jun 2013
After some thought, and looking at how light the frame is built, I decided to put some stiffeners in even though this will not be original, I think it will help the frame last with the stresses of modern radial tires. I used copper weld-through primer in the boxed areas.
Blocked off towers inside and repaired the rust at the bottom.
Stiffeners along the bottom
Jack plate and tow hook under the front cross member
Added material at the sway bar mounts
Under the front uppler flanges. These are a little smaller that usual so that they aren't as visable from the top.
Gussets at the back, top and bottom
And gussets at the rear towers
- rcombs
- Second Gear

- Posts: 146
- Joined: 14 Jun 2013
Thought I would post a few pictures. Not much progress from May through early July. Graduations, vacation, house chores have kept me busy.
I have finished the frame and removed everything from the body except the harness and the heater assembly. I built a rotisserie from a couple of engine stands and mounted the body. Stripping the paint is next.
Rick
I have finished the frame and removed everything from the body except the harness and the heater assembly. I built a rotisserie from a couple of engine stands and mounted the body. Stripping the paint is next.
Rick
- rcombs
- Second Gear

- Posts: 146
- Joined: 14 Jun 2013
rcombs wrote:Thought I would post what I have been working on. I have cleaned up and refinished some of the front and rear suspension pieces. I used gloss black Rust Seal for the front control arms. It seems to match the factory gloss well. I used Satin black Rust Seal for the front hubs, front steering arms, brake shields and rear control arms. It looks good but is glossier than the original finish. I used Rust-oleum hunter green and regal red to mark the left and right hand components. Both colors were very close to the original colors.
I used Zero Rust in red for the rear hubs. It seems to match the original color very well.
I also replaced the bushings in the control arms with new factory style bushings.
Don't forget the red and green 1/2 to 5/5 dots on top of the bearing area of the rear struts
Cheers
Graeme
LOTUS Evora 400
Ginetta G27 S2
66 one-off 2.6Ltr v8 Mid-engine Berlinetta Coupe........... in restoration
..................................................Age doesn't matter unless you are a cheese................................................
Ginetta G27 S2
66 one-off 2.6Ltr v8 Mid-engine Berlinetta Coupe........... in restoration
..................................................Age doesn't matter unless you are a cheese................................................
- au-yt
- Second Gear

- Posts: 203
- Joined: 11 Mar 2014
I'm no expert, but that seems a lot of work not to add lightness........ 
 fred
fred
'Never give up!....unless it's hopeless.....'
1970 S4 dhc big valve
1973 Ginetta G15
1967 Ginetta G4 [sadly now sold]
1959 lotus elite type 14
1970 S4 dhc big valve
1973 Ginetta G15
1967 Ginetta G4 [sadly now sold]
1959 lotus elite type 14
- Elanconvert
- Third Gear

- Posts: 344
- Joined: 26 Jul 2013
Though I would post an update. Been stripping the paint. Oh boy what fun. I tried Strip Kleen aircraft stripper for fiberglass, but it attacked the gel coat in some places. After that I switched to the razor blade method which worked well in most spots. I still have the door jams and engine compartment to do. The body originaly had been jitter bugged with 400 or 600 grit paper. The only sanding marks on the gel coat were the little pig tails from the jitter bug.
I am going to try some stripper I got at Lowes on the jambs and engine compartment.
Rick
I am going to try some stripper I got at Lowes on the jambs and engine compartment.
Rick
- rcombs
- Second Gear

- Posts: 146
- Joined: 14 Jun 2013
rcombs wrote:Man, it has been a while since I have updated this.
No problem there. Better to be working on the car than just talking (posting) about it.
Mechanical Engineer, happily retired!
'67 S3 SE FHC
See Facebook page: W J Barry Photography
Put your money where your mouse is, click on "Support LotusElan.net" below.
'67 S3 SE FHC
See Facebook page: W J Barry Photography
Put your money where your mouse is, click on "Support LotusElan.net" below.
-

Galwaylotus - Coveted Fifth Gear

- Posts: 1260
- Joined: 01 May 2006
Total Online:
Users browsing this forum: No registered users and 14 guests


