5 Speed box: A little bit of the old "Vince Reynard magic"..
33 posts
• Page 1 of 3 • 1, 2, 3
Now the gearbox is out of the car, it's time to apply a little bit of Vince Reynard magic to the gear change. There are a few items to be improved.
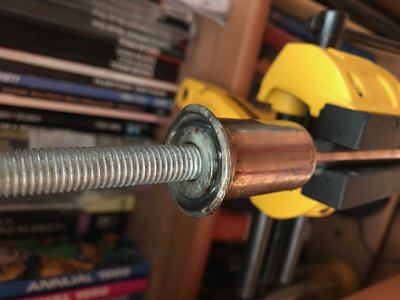
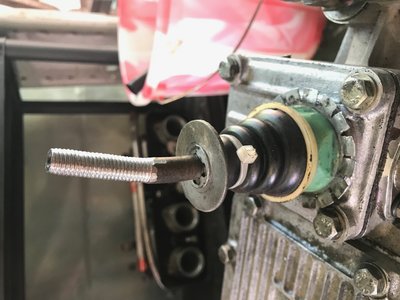
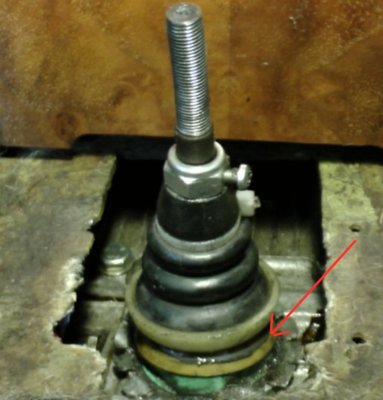
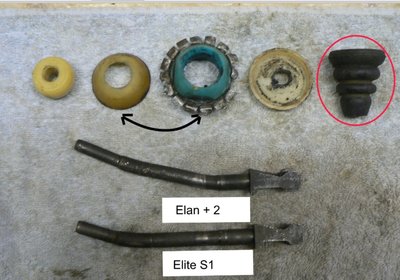
First up the gear shift. In order to address this I have removed the rubber "bellows" spring which had gone gooey after years of attack from engine oil. Vince supplied me with a spare (thanks!) and although it has a split it's leagues better than mine. I cut the old one off, then heated the anti sizzle device with a blow torch until the rubber had melted enough to allow me to pull it apart. The inside of the rubber is like a bush, it has a steel tube that fits tightly onto the lower part of the shift, so I drove that off with a hammer and wrench. Next up, examination of the ball joint. All good, surprisingly, though a little rough from years of gritty oil. I've cleaned it all and applied LM grease, then fitted the replacement bellows (much easier on the bench than fitted to the gearbox). For now, a fat washer under the circlip to add a little extra preload.
Second. When moving to the 3rd/4th gate, I can see that there is a lot more motion than is necessary. I didn't have the same problems as Vince did (not engaging correctly due to too much lateral movement) but I thought I could tighten it up a little. In his video, Vince used an O ring for this purpose but for now (and raher experimentally) I've put a small plastic tie wrap round the slider bar to act as a sort of spacer. It's loose so the ratchet block doesn't get in the way.
Here's a quick demo of the improved shift. Click-click-click.
https://www.youtube.com/watch?v=_Om6hrL8_ZY
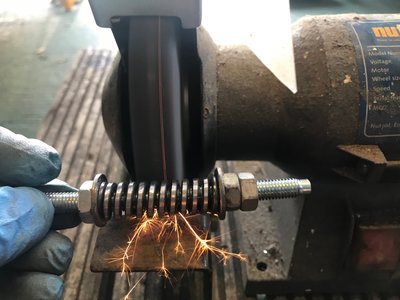
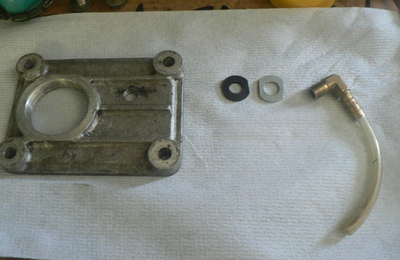
Third mod - 5th gear gate spring is too strong. It's a fat little thing that sits under the cover bolted to the left hand side of the gear box, just below the gear shift ball joint. The way to weaken a fat spring like this is to grind it down a bit (the sides, not the ends) so that the wire that makes up the coils is thinner (hence, weaker).
The spring is held in a bolt with a couple of nuts and you need to try to turn it as you go so that you get an even grind. Take it off the bolt periodically and refit to the gear box in order to test the feel of the 5th / reverse gate action. I also ground the ends a bit to make it shorter (thus, reducing the preload when fitted).
Fourth mod - the famous reverse gear plunger fix. The plunger assembly is there to hold the gearbox in 5th gear, but like the gate spring it's a bit too strong, facilitating what I call a "manly heave" to get out of 5th gear. One problem with this is that the box always jumps into 4th as you are pulling the stick so hard, and I wonder if this is good for it. Probably not!
Anyway, the plunger's spring and pin are accessed under the gearbox behind a huge domed nut. All I did was take the spring out and grind it back a bit (shortening it). This has the same effect as the more common "add an extra washer to the dome nut" approach, but saves me the hassle of finding a suitable washer. It's readily accessible under the car, anyway, so can be fettled further if need be. Some care is needed here as you can end up with the car jumping out of 5th if you go too far. So grind a little, test, grind, test, and so on is the order of the day.
Next we need to think about attaching the top half of the gearshift to the bottom half, where the anti sizzle bit is located. Following Vince's method I have put some M10 nuts on a bolt and then used Araldite to lock it all into place. It's setting as I write this post.
I've also cut a matching thread in the top of the lower stick. I had to grind it down a little as the M10 die would not go round the shaft - too fat.
So there we are. Hopefully a much improved gearshift awaits thanks to advice and info obtained from Vince Reynard. Much obliged, sir!
Last edited by JonB on Fri Aug 23, 2019 9:57 am, edited 1 time in total.
-

JonB - Coveted Fifth Gear

- Posts: 2358
- Joined: 14 Nov 2017
Looks like fun.
Hows the side to side movement in 1st and 2nd? Another common mod is to add some washers on the link selector rod (part 4 on the diagram) between the selector and the case. I went further and fitted a conical spring which removes the slack and also provides 3rd/4th centering like a modern 5 speed.
I'd also take a very careful look at the gear stick lower ball and the condition of the ball. Mine had gone very soft and was breaking down. Shame to do all this work and have it only last a few months/years.
Will be interested in feedback if you get much sizzle with these mods when you get it back on the road.
'73 +2 130/5 RHD, now on the road and very slowly rolling though a "restoration"
- mbell
- Coveted Fifth Gear

- Posts: 2643
- Joined: 07 Jun 2013
JonB wrote:
Second. When moving to the 3rd/4th gate, I can see that there is a lot more motion than is necessary. I didn't have the same problems as Vince did (not engaging correctly due to too much lateral movement) but I thought I could tighten it up a little. In his video, Vince used an O ring for this purpose but for now (and raher experimentally) I've put a small plastic tie wrap round the slider bar to act as a sort of spacer. It's loose so the ratchet block doesn't get in the way.
Wrong way around Jon. You move the lever right the crosshaft goes left. Hence the 5/rev plunger being on the left.
The O ring was to give better line up on 1 / 2. 3rd was not engaging correctly because of too little lateral movement. I.E. the 5th/Rev protection spring had to be compressed slightly to allow engagement. This was cured by simply packing out the spring housing 1mm to allow more side movement. This also would lower the spring preload. Gringing it down seems a bit drastic!
P.S. Not so much of the old or I'll point my spyder curse at you.
As Mr Bell mentioned, a neater alternative would be a centralising coil spring but I could not find 1 in the UK that would compress flat.
- vincereynard
- Coveted Fifth Gear

- Posts: 1071
- Joined: 12 Jan 2015
I recall mentioning this to you when we met. Like, try a battery spring (though that is probably too weak).
If mbell could provide the spring specification I might be able to find a UK source. Spent a while looking for springs to replace the 5th gate plunger spring, but in the end decided to mod it.
Regarding sizzle. None before the mod and the rubber was ossified rock hard so the joint didn't flex at all. As a result, I predict none after (as was Vince's experience, I believe).
Yes, right, left, etc. You get the gist. There was no confusion when I did it, honest! The purpose of this mod was to reduce the gap between 1-2 and 3-4 gates, and I could see the selectors could accommodate it. That is, when engaging 1st or 2nd, the selector tab moves more than it must. Of course it might feel odd when driving as this lateral movement will be less than that needed to get into 5th, so I may reverse it.
Cheers
JonB
PS, grammatically speaking, it's the magic that's old, not yourself. As in "good old magic", implied. Hence the quotes...
-

JonB - Coveted Fifth Gear

- Posts: 2358
- Joined: 14 Nov 2017
https://www.mcmaster.com/1692k56
or
https://www.mcmaster.com/1692k64
I bought two and fitted one of them but not sure which, I'd guess the firmer of the two. It could probably benefit from something a littler firmer still. The outer diameter is larger than the available surface on the gearbox case so I had to make a little spring holder/spreader for it.
I also replaced the 5th gear plunger spring with:
https://www.mcmaster.com/9657K353
May still be a little firm but better than original and I didn't have to get the grinder out....
I think I was very lucky (in some ways) that my box looked to have had a rebuild very recently which included getting the shift mechanism in decent order. So just needed a few tweaks to improve the standard issues. It shifts really well now, but do plan to rebuilt the original gear stick I replaced at some point.
'73 +2 130/5 RHD, now on the road and very slowly rolling though a "restoration"
- mbell
- Coveted Fifth Gear

- Posts: 2643
- Joined: 07 Jun 2013
Jon,
You seem to have a bit missing.
There should be a nylon cupped washer over the screw in bit.
Second from the left.
You seem to have a bit missing.
There should be a nylon cupped washer over the screw in bit.
Second from the left.
- vincereynard
- Coveted Fifth Gear

- Posts: 1071
- Joined: 12 Jan 2015
Well spotted, Vince.
It wasn't there when I dismantled the stick. Instead, the piece that the bellows sits on pivots around the threaded base (which is hemispherical at the top to enable this). I take it that on your stick the cupped washer is not pivoting on the base, but held still so the bellows base can pivot round it?
We may be looking at a missing part, or a typical Lotus "alternative design"?
You had sticks from the Elan and Elite - did they both have the bottom cup?
-

JonB - Coveted Fifth Gear

- Posts: 2358
- Joined: 14 Nov 2017
JonB wrote:You had sticks from the Elan and Elite - did they both have the bottom cup?
Yes. It is shown in the manual Section F Page 26 (??)
Possible why you needed a spacer under the circlip? It gives a nice(ish) bearing surface for the bellows cup thing. I assembled with silicone grease as it does not seem to attract the muck so much.
On the plus side when that's in place your change will be even better!
Thought of a breather?
- vincereynard
- Coveted Fifth Gear

- Posts: 1071
- Joined: 12 Jan 2015
Breather... no, I'd forgotten about that. Good call.
Now where can I get the missing cup from, I wonder? Incidentally, the additional spacer under the circlip isn't really necessary but does improve things marginally. Cup would be better, obviously.
Now where can I get the missing cup from, I wonder? Incidentally, the additional spacer under the circlip isn't really necessary but does improve things marginally. Cup would be better, obviously.
-

JonB - Coveted Fifth Gear

- Posts: 2358
- Joined: 14 Nov 2017
JonB wrote:Thanks, that's great. I'll contact these guys and ask if they can ship to the UK.
apparently the 5th rear plunger spring replacement comes in pack of six... if you manage to get some, I'll be happy to buy one (I've gone the washer under the cap route, and my fifth is still very different from the other 4, hard to disengage being the most problematic).
Can that spring can be changed in situ from the bottom of the car (don't remember how it was when I opened the hex cap, though I'm sure there was not too much oil pouring when doing so, maybe a spoonful or two) ?
S4SE 36/8198
-

nmauduit - Coveted Fifth Gear

- Posts: 1999
- Joined: 02 Sep 2013
JonB wrote:Now where can I get the missing cup from, I wonder?
Are you hinting?
Problem is, I put it away carefully so finding it could take some time.
Re the breather. IThe original breather thread -
viewtopic.php?f=37&t=39417
Vent (from Mr Bell again) - https://www.mcmaster.com/9833k18
Very Neat!
- vincereynard
- Coveted Fifth Gear

- Posts: 1071
- Joined: 12 Jan 2015
nmauduit wrote:apparently the 5th rear plunger spring replacement comes in pack of six... if you manage to get some, I'll be happy to buy one (I've gone the washer under the cap route, and my fifth is still very different from the other 4, hard to disengage being the most problematic).
I think this spring is still a bit on the firm side but still better than the original.
nmauduit wrote: Can that spring can be changed in situ from the bottom of the car (don't remember how it was when I opened the hex cap, though I'm sure there was not too much oil pouring when doing so, maybe a spoonful or two) ?
Nope, its mounted to the side of the selector housing which is at the top left side on the gear box. You can just about see it in Jon's first picture on his first post (righthand side of picture). This spring control the effort need to slide the gear stick across to the 5th/reverse gate.
The spring for the 5th gear detente is mounted underneath with the dome nut, this controls the effort to take it out of 5th. This can be done in situate with just a small loss of gearbox oil.
'73 +2 130/5 RHD, now on the road and very slowly rolling though a "restoration"
- mbell
- Coveted Fifth Gear

- Posts: 2643
- Joined: 07 Jun 2013
33 posts
• Page 1 of 3 • 1, 2, 3
Total Online:
Users browsing this forum: No registered users and 42 guests

