New Plus 2 S130 dashboard
21 posts
• Page 1 of 2 • 1, 2
Very Nice Jon. Supplied by Classical Dash?
Robbie
Robbie
-

Robbie693 - Coveted Fifth Gear

- Posts: 1515
- Joined: 08 Oct 2003
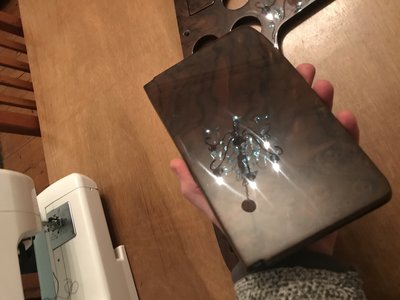
Oh, that's a reflection of the chandelier in the dining room.
No, it's not from Classical Dash. I think they are a bit expensive.. plus reports like this do not instil confidence: http://www.lotuselan.net/forums/lotus-elan-f19/classical-dash-beware-t39507.html
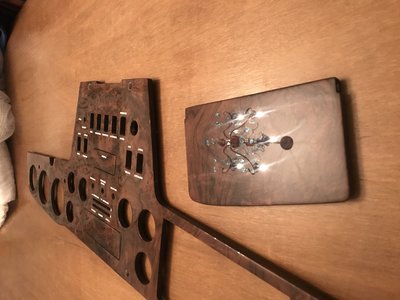
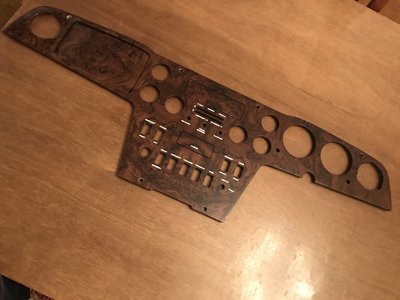
My dash came from Nick Martin: http://www.nicholas-martin.co.uk. ?170 + ?20 shipping. There may be a backlog, but it is well worth the wait. I think he makes them to order. I have never seen wood look this good. If you examine the glove box door you'd swear it was made of glass, such is the perfection of the finish on the lacquer. The rest of the dash is the same. It came wrapped in cotton wool (no, really) over a layer of bubble wrap, sandwiched between two sheets of plywood, with a thicker sheet to prevent it bending for good measure. Then the whole thing was wrapped in industrial cling film (the sort of stuff pallets of boxed goods are wrapped in), so it arrived in one piece with zero damage. It'll feel like sacrilege drilling the holes for the glove box hinge and catch. I specified walnut veneer on both sides (contrary to "standard", which is walnut on the front but some ordinary stuff on the back).
-

JonB - Coveted Fifth Gear

- Posts: 2357
- Joined: 14 Nov 2017
I'd not heard of Nick but it looks like he was formerly known as City Polishers.
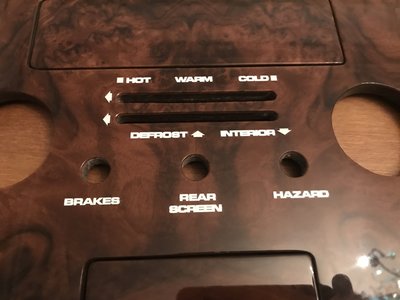
It's the first time I've seen the heater labelling done fully, i.e. with the arrows and blocks. These are usually missing, did you have to specify features like this or did they come as 'standard'?
It's the first time I've seen the heater labelling done fully, i.e. with the arrows and blocks. These are usually missing, did you have to specify features like this or did they come as 'standard'?
-

Robbie693 - Coveted Fifth Gear

- Posts: 1515
- Joined: 08 Oct 2003
Jon,
If I may offer some hard learned advice,
Test fit the bare dash to the car, you may also need to remove some of the mounting bolt sleeves from your old dash, so be carfeul not to chip that lovely laquer when refitting them.
Then, test fit all the switches and gauges, as you may need to relieve the holes for both perimeter and depth, in fact test fit all fittings. It?s much easier done on the work bench,
Also when it comes the gauges (especially speedo, Rev counter), allow enough slack in the wires to allow easy removal of the gauge once in situ.
.....and no harm in investing in a half loom,
.... assuming you have a voltage regulator somewhere, consider changing to a digital one,
.... and make sure the first thing you do is remove the battery!
Good luck and enjoy.
Peter
1968 +2 BRM
- Peter +2
- Third Gear

- Posts: 270
- Joined: 26 May 2010
Peter, I am open to all advice on this. The car is still in one piece. I plan to wait until it's warmed up a bit out there, then remove engine & gearbox (they need new oil seals, clutch needs an overhaul and the gearshift is up for some of the old "Vince Reynard magic"). With these out I will be able to remove the ambient temperature gauge sensor and its capillary pipe with reduced risk of damage.
I've got to confess that I've got a lot of trepidation about the whole thing, having seen pictures of what is behind the dash (a scary looking mess of wiring) and I've already encountered Lucar connectors that seemed to be fused together and couldn't be separated. It's a bad design, because you cannot get at the bullet to separate it; you have to pull on the wire itself. Bad, as they often snap.
Regarding the voltage regulator, I already bought the parts to convert the thermoelectric one to solid state.
The trial fitment of gauges and switches is a given. I think you have to prepare the whole dash with all fitments on the bench prior to fitting and I've seen people attach sublooms to it as well. I recall that some multi block connectors were used too.
I have a question about the switches. What's the best way to ensure they are centred in the holes prior to drilling and screwing them in? Is there any adjustment possible (for example, oversized holes in the switch fixing tabs)?
Finally, does the original loom use "flag" connectors for the gauges (I'm expecting they do not, but thought to ask anyway).
-

JonB - Coveted Fifth Gear

- Posts: 2357
- Joined: 14 Nov 2017
Can't really help with the questions but in some ways I'd almost prefer to have a slightly further from perfection dash turn up. When you come to fit it there's bound to be the odd scratch or chip creep into the process and you'll be hit with 'I've ruined it' guilt - or I would be anyway.  The earlier Elans seemed to have a less glassy finished dash that look like they'd withstand a bit more manhandling.
My current dash - and the mess behind it - badly needs replacing so I may be facing the reality of it all later in the year but I've got a couple of extra instruments and a few switches that need extra holes drilling / cutting. Standing in front of your dash, hole saw in hand, would definitely cause a few palpitations.
My current dash - and the mess behind it - badly needs replacing so I may be facing the reality of it all later in the year but I've got a couple of extra instruments and a few switches that need extra holes drilling / cutting. Standing in front of your dash, hole saw in hand, would definitely cause a few palpitations.
Stuart Holding
Thame UK / Alpe D'Huez France
69 S4 FHC
Honda GoldWing 1800
Honda CBX1000
Kawasaki H1 500
Yamaha XS2
Thame UK / Alpe D'Huez France
69 S4 FHC
Honda GoldWing 1800
Honda CBX1000
Kawasaki H1 500
Yamaha XS2
- 69S4
- Coveted Fifth Gear

- Posts: 1124
- Joined: 23 Sep 2004
I recommend eliminating the bullets and using some sort of multi-pin plug. I'm using two 15-pin Molex plugs, and I've got them oriented so that one is male on the dashboard side of the connection and one is male on the car side, so that they can't be cross-connected.
1970 Elan Plus 2 (not S) 50/2036
2012 BMW R1200GS
"It just wouldn't be a complete day if I didn't forget something!" -Me
2012 BMW R1200GS
"It just wouldn't be a complete day if I didn't forget something!" -Me
-

The Veg - Coveted Fifth Gear

- Posts: 2185
- Joined: 16 Nov 2015
JonB wrote:I've got to confess that I've got a lot of trepidation about the whole thing, having seen pictures of what is behind the dash (a scary looking mess of wiring) and I've already encountered Lucar connectors that seemed to be fused together and couldn't be separated. It's a bad design, because you cannot get at the bullet to separate it; you have to pull on the wire itself. Bad, as they often snap.
If I was redoing that rat's nest I would rewire the entire dash to modern multipin connectors. Then mod the existing loom to suit. (Plus the column switches).
You could then wire the dashboard on a soft surface, eliminate excess wires and do it in the warm.
Then just slip it into place as virtually one piece. Far as I remember you need the driver air vent out to access the speedo and the speedo out to access the tacho.
Veg beat me to it!
- vincereynard
- Coveted Fifth Gear

- Posts: 1071
- Joined: 12 Jan 2015
gjz30075 wrote:Jon, is the dash veneered or is it a solid hunk of wood?
It's a plywood veneer. As original, I believe. A lot browner than I was hoping for - I got used to the light tan colour of my original dash, but there is too much damage to restore it (nice chunk of veneer missing above the radio).
I'll look into Molex connectors. Is there space to fit them? Must be...
@Vince: New speedo cable needed, the needle jumps around a bit at low speeds. Also, noticed on today's maintenance drive that cold air is is coming through a gap between the dash and trim. It's the vent trunking connection, I'll warrant. I've seen pictures of how bad a fit it is.
-

JonB - Coveted Fifth Gear

- Posts: 2357
- Joined: 14 Nov 2017
JonB wrote: New speedo cable needed, the needle jumps around a bit at low speeds.
That could be a job to add to the engine out list. The gearbox speedo drive CAN be a bugger to reach. Toad is OK as I fettled it a bit to point in the right direction.
You need the "dismountable" gearlever, it makes all this faffing a lot easier.
- vincereynard
- Coveted Fifth Gear

- Posts: 1071
- Joined: 12 Jan 2015
Thread Creep!
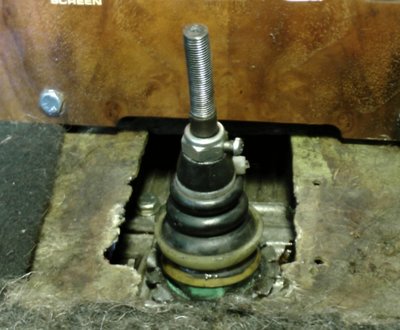
The lever mod (as in making it "take apartable") is not the same as modifying the crossshaft position.
Your floppy gearchange could be that the rubber bellows / spring is split and / or the nasty circlip is missing.
If you can rattle the lever in a vertical position the bellows/ spring is not working. With the mod. it allows you to adjust the tension. Note white cable tie reinforcing the bellows - they split at the top.
It also makes removal / installation of the lever far less of a swearing / 3 handed job.
Nothing to do with the dashboard but it might allow access to the speedo. cable easier.
I note the Autocar '72 roadtest compains about the gearchange baulking in 1st and 3rd so it seems quite normal!
- vincereynard
- Coveted Fifth Gear

- Posts: 1071
- Joined: 12 Jan 2015
21 posts
• Page 1 of 2 • 1, 2
Total Online:
Users browsing this forum: No registered users and 16 guests

