Front end overhaul
Here I will document the front end overhaul work and / or ask lots of questions.
If you've followed my other threads you'll probably know I intend to replace the outer joints of my front suspension. Upper ball joints, track rod ends, trunnions. I've ordered all the parts I think I need, plus new bolts / nuts.
I took the front wheels off the car and gave all the fasteners a good spray with WD40 to try and help free them up. Heat gun on standby.
The first question is about the spinners. A PO has lubed them with Copperslip grease, which gives them a satisfying turning feel, but is it safe like that, or should the threads be dry?
-

JonB - Coveted Fifth Gear

- Posts: 2371
- Joined: 14 Nov 2017
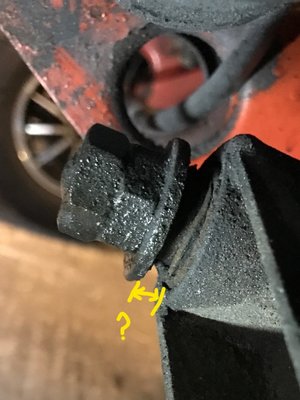
The gap is because the nut and washer bottom out on the tube bonded in the metalastic .
I can't understand why someone has fitted 2 half lock nuts. For me the correct way is a normal nyloc nut.
The original nuts used to be "stover" all steel lock nuts which had the nasty habit of stripping the thread off the pivots when undone.
I suggest you use only new nyloc nuts.
Alan
I can't understand why someone has fitted 2 half lock nuts. For me the correct way is a normal nyloc nut.
The original nuts used to be "stover" all steel lock nuts which had the nasty habit of stripping the thread off the pivots when undone.
I suggest you use only new nyloc nuts.
Alan
Alan.b Brittany 1972 elan sprint fhc Lagoon Blue 0460E
- alan.barker
- Coveted Fifth Gear

- Posts: 3762
- Joined: 06 Dec 2008
alan.barker wrote:The gap is because the nut and washer bottom out on the tube bonded in the metalastic .
I can't understand why someone has fitted 2 half lock nuts. For me the correct way is a normal nyloc nut.
The original nuts used to be "stover" all steel lock nuts which had the nasty habit of stripping the thread off the pivots when undone.
I suggest you use only new nyloc nuts.
Alan
That looks like a Spyder chassis, they use loose spindles if you think about it it?s really the only way you can lock it to tighten the assembly.
- Craven
- Coveted Fifth Gear

- Posts: 1623
- Joined: 14 Sep 2013
Jon,
has the chassis got a square (lotus) vacuum chamber or is it a round (spyder) vacuum chamber.
Alan
p.s. sorry i didn't see you have a spyder chassis
has the chassis got a square (lotus) vacuum chamber or is it a round (spyder) vacuum chamber.
Alan
p.s. sorry i didn't see you have a spyder chassis
Last edited by alan.barker on Sat Dec 02, 2017 1:32 pm, edited 1 time in total.
Alan.b Brittany 1972 elan sprint fhc Lagoon Blue 0460E
- alan.barker
- Coveted Fifth Gear

- Posts: 3762
- Joined: 06 Dec 2008
What's the gap like on the inside? And the others. That will tell you if the Bush is stuffed. Rubber should be intact with equalish gap either side with no pudding hanging out. Bone inaccuracy can cause stress on the rubber. This is why you check for any unusual tension when you dummy build the bones. I do top separate and bottom the same.
M?ke
M?ke
Mike
Elan S4 Zetec
Suzuki Hustler T250
Suzuki TC120R trailcat
Yamaha YR5
Suzuki Vstrom 650XT
Suzuki TS185K
Elan S4 Zetec
Suzuki Hustler T250
Suzuki TC120R trailcat
Yamaha YR5
Suzuki Vstrom 650XT
Suzuki TS185K
-

miked - Coveted Fifth Gear

- Posts: 1191
- Joined: 29 Sep 2003
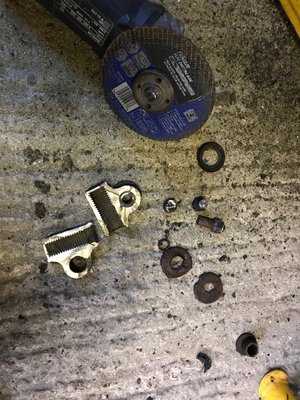
I have a Bosch angle grinder which I bought 25 years ago and it is still going strong. I have just named it MR ZURKON after a weapon in a video game (Ratchet and Clank). MR ZURKON flies around after your on screen character and destroys your enemies, saying amusing things like "MR ZURKON DESTROY!" to himself. I think you can imagine where this is going...
Today I tried to dismantle the N/S trunnion joint, but the pivot bolt and crush tube were completely seized together, meaning I could not withdraw the pivot bolt despite lots of "gentle persuasion" with a large hammer. So out with the angle grinder and...
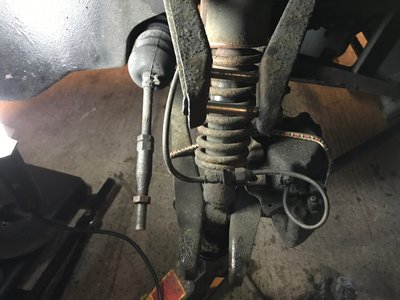
I had removed the top joint and (with a lot of effort) unscrewed the upright from the trunnion (turning clockwise as the N/S trunnion has a reverse thread). As I'd thought, the trunnion had been lubricated with grease and it's dried out completely, so the only soft grease is in the lubrication tube tapped out from the centre of the threaded part of the upright, where it is as much use as a chocolate teapot. New trunnions on order!
The top ball joint is kind of OK, feels good, like it's still got grease inside it. Rusty as a pear though, so the replacement's on its way.
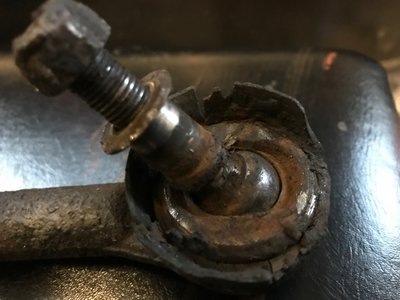
The track rod end, on the other hand, is completely tatered.
Again, replacements were ordered which have already arrived, and they have grease nipples.
I have a number of questions about the next steps. I suppose I should clean all the crud off the upright, dust shield thingy, steering arm and hub assembly and paint them with something like Hammerite (smooth). Should I do any more than a brush over with a wire brush or should I also dunk it all in Coke (phosphoric acid) to get all the rust off before painting? People are going to say there are no short cuts, but I do want to be able to drive the car soon.
Other question is about those pesky inner bushes. At ?8 per bush, I'm reluctant. I probably shouldn't ask but could I leave that for another time? Can they be changed without dismantling the wishbones entirely? Hmm, on the other hand, most of the today's efforts have been about struggling with rusted bolts. When I reassemble I'm using copper grease everywhere, so It'll come apart easier.
So anyway, here we are.
Tomorrow I will do the other side. Oh, and I have new steering column bushes and the new U/J to fit, when it arrives.
-

JonB - Coveted Fifth Gear

- Posts: 2371
- Joined: 14 Nov 2017
Forgot to say: the hub was still pretty well packed with grease and it came of pleasingly easily, the only part that did. I've put it to one side for now but will clean it and inspect the bearings and mating surfaces for wear. If it is OK I will repack with LM grease and reassemble, using the "blob of grease in your palm then push the needle bearing into it (side on) to force grease into the races" technique.
There's a nearly new disk (in terms of rotor wear) attached to the hub, with a thick edge of rust. I have no qualms putting it back on the car as it looks to have been stood for a long time rather than used much. Besides, it and its mate on the other side of the car were quite happy to lock the front wheels up the other day! So far I have not removed it from the hub and neither have I taken the stub axle off as I think it all looks OK.
I have seen more blemishes in the paintwork. I know the PO paid ?3500 for the respray, and I am pretty sure a good paint shop would take one look and laugh. Fortunately I didn't pay ?3500 for it otherwise I would be onto the nearest lawyer. However, since the car wasn't stupidly priced I am OK with the paint, but it does annoy me each time I see (yet) another blemish.
I think what I am doing here is more of a "maintenance overhaul" than a full-on restoration. My car is never going to be concours, but it will be a safe, driveable classic that is as reliable as I can make it.
-

JonB - Coveted Fifth Gear

- Posts: 2371
- Joined: 14 Nov 2017
JonB wrote:I think what I am doing here is more of a "maintenance overhaul" than a full-on restoration. My car is never going to be concours, but it will be a safe, driveable classic that is as reliable as I can make it.
I'm in more or less the same boat and started dismantling my front end a few days ago. From the picture it looks like your stuff is maybe dirtier than mine but no worse for rust and such. I've got my upper arms off, the bushes pressed out, and most of the paint stripped. Before stripping the paint they got an overnight bath in Evaporust, then stripped what I could with a wire wheel in a cordless drill, and will get the remaining paint in the tight spots with some chemical stripper. One more dunk in the Evaporust after that then paint after that, press in new bushes, and back on the car along with new ball joints. Then I get into the lower arms and trunnions and eventually the anti-roll bar. Everything moves freely, so no visits from Mr. Zurkon for me!
But back to not doing a concours job of it, I agree. I'm going more for functionality and maintenance. I debated whether to clean up the arms at all, thinking that I may do a body-off and frame refurb at some future point, but then decided that if I do the arms now, it'll make that future job one step easier. I'm finding the arms quick and easy to clean up and deal with, so I think it was a good decision.
1970 Elan Plus 2 (not S) 50/2036
2012 BMW R1200GS
"It just wouldn't be a complete day if I didn't forget something!" -Me
2012 BMW R1200GS
"It just wouldn't be a complete day if I didn't forget something!" -Me
-

The Veg - Coveted Fifth Gear

- Posts: 2191
- Joined: 16 Nov 2015
Hi Jon
For my two penny?s worth, I?d change the inner bushes while you are at it if they look at all suspect. You need the wishbones in a press or large vice to put them in and out and maybe some heat to get the old ones out. A selection of sockets can be used to press them out with and into. Refit with new nylon nuts, if it is a Spyder chassis with removable spindles you may need to use two locknuts on one end to stop the spindle from turning while you put the first nylon on but the second should be ok with the added friction of the spindle in the bushes etc. Don?t forget, don?t fully tighten the spindle nuts until the car weight is on the suspension otherwise the bushes will be under excessive twisting load at normal ride height. Personally I wouldn?t consider the poly bushes for pure road use.
For cleaning I got fed up of wire brushes etc and as I already had a compressor I went to machine mart and bought myself a bench top sand blasting cabinet, best thing I?ve done in ages!
Change is inevitable, except from a vending machine!
- Bigbaldybloke
- Fourth Gear

- Posts: 889
- Joined: 16 May 2017
Right, O/S upright is out! No Mr Zurkon this time, the trunnion was stiff but came out in one piece. This is probably down to it being a UK car and as we drive on the left hand side of the road, the off side wheel doesn't get so much rainwater and other crud on it. I can see all the caked on dried out grease that the trunnion's been lubricated with, it's horrid stuff, like filthy wax.
The only problem was one of the dust cover bolts sheared off. I'm of a mind to leave it because it's one of the top ones (i.e., not attaching the steering arm) and there is a bit of bolt sticking out that will help locate the cover. I could drill it out or use a special removal tool (I have one, but it'll probably shear off too). Problem is I do not wish to risk damaging the tapping on the arm. I am sure many of you will say "do it right" but really, is there any harm?
So, I have two boxes of parts, all greasy and grimy. I used a greasy finger to mark them O/S and N/S (couldn't find a pen). Wishbones are still on the car, not sure I want to try removing them. The top joints are still attached to the uprights, they seem OK but I have new ones anyway so I will whack 'em off with the joint extractor.
Next, some cleaning and Hammeriting....
-

JonB - Coveted Fifth Gear

- Posts: 2371
- Joined: 14 Nov 2017
Jon
I reckon that you may find the wishbone bushes pretty damn tight.
I couldn't shift mine and when I took them to a garage the press went well over 10T before they popped.
New ones should go in with a vice I suppose - but I changed to poly bushes.
Mark
I reckon that you may find the wishbone bushes pretty damn tight.
I couldn't shift mine and when I took them to a garage the press went well over 10T before they popped.
New ones should go in with a vice I suppose - but I changed to poly bushes.
Mark
- MarkDa
- Coveted Fifth Gear

- Posts: 1113
- Joined: 15 Apr 2017
Total Online:
Users browsing this forum: No registered users and 18 guests


