Differential Brace Fitting - Are these instructions ok?
14 posts
• Page 1 of 1
I've purchased a pair of Sue Miller's drive shafts for my car along with a differential brace and a pair of heavy duty differential mounts from Tony Thompson.
Because of ill-health I hope to get a local garage (who are very sympathetic towards older cars) to fit the parts.
Their first attempt at fitting the brace ended in failure due to "lack of space".
Consequently I've knocked up these notes which will hopefully provide as much space as is feasibly possible between the differential ears and the chassis (which has no dents beneath the differential caused by a badly placed jack).
Any advice or recommended changes to the procedure would be most welcome!!
I want the notes to be as fool-proof as is possible.
Suggested Order of Work
? Remove existing drive-shafts
? Remove differential casing bolt which will be replaced by the longer bolt
? Remove the differential torque rods
? Remove (from within the boot) the 2 large differential mounting bolts which pass through the ?ears? of the differential
? Collect the existing large washers fitted above the ?ears? and within the boot
? Remove the pair of existing differential mounts from inside the boot
Fitting the brace
? Position the differential brace onto the ears of the differential
? Loosely fit long differential casing bolt
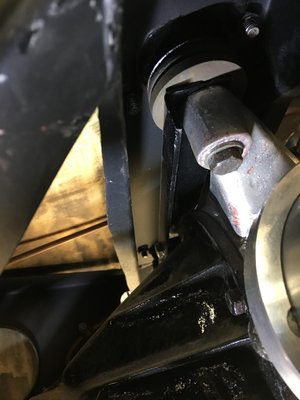
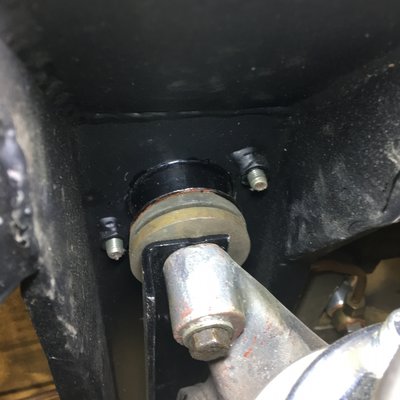
? Place two new large load-spreading washer on top of brace (i.e. one above each ear)
? Fit the new heavy-duty differential mounts inside the boot
? Fit new bolts through:
o Top load-spreading washer in boot
o Differential mount
o Load-spreading washer beneath the mount
o Differential brace
o Differential ear
o 1? load-spreading washer beneath ear
? Tighten the differential mount bolts to 22-27ft/lb
? Tighten differential casing bolt
? Fit torque rods and new torque rod bushes
o Bush sequence is: Welded washer - bush - washer - diff ear - washer - bush - washer (with small hole) ? nut.
? Tighten torque rods to differential (i.e. at bushes) to 22-27ft/lb
Once the differential brace has been fitted follow the instructions provided to fit the replacement drive shafts.
Steve
'64 S1 Elan (Owned since '73)
'69 Alfa Romeo 1750 Spider Veloce (Owned since '77)
'70 Morris Minor 1000 (Owned since '85)
'64 S1 Elan (Owned since '73)
'69 Alfa Romeo 1750 Spider Veloce (Owned since '77)
'70 Morris Minor 1000 (Owned since '85)
-

AlfaLofa - Third Gear

- Posts: 458
- Joined: 19 Aug 2006
Steve,
I have this on my to-do list, so I cannot help directly...
...however, I remembered reading "only one washer" when a brace is fitted so sat up & took notice when this thread was started, and saved it for future reference.
elan-f15/fitting-ttr-diff-mounts-t18540.html
HIH
Get fit asap.
Regards - Richard
- ardee_selby
- Coveted Fifth Gear

- Posts: 1090
- Joined: 30 Sep 2003
I couldn't get my diff' in with the brace fitted, so I got the diff in situ' then fitted it. I haven't got much patience so it couldn't have been too difficult 
On the subject of washers I think from memory I fitted one only but the important thing as I understand it is to have the diff' unit as low as possible in the chassis while maintaining a gap underneath ie the diff should not sit on the chassis when fully tightened.
On the subject of washers I think from memory I fitted one only but the important thing as I understand it is to have the diff' unit as low as possible in the chassis while maintaining a gap underneath ie the diff should not sit on the chassis when fully tightened.
John
No longer active on here, I value my privacy.
No longer active on here, I value my privacy.
-

nebogipfel - Coveted Fifth Gear

- Posts: 1274
- Joined: 25 Sep 2003
Hey Fella's.
Don't put up with the angst of trying to install the diff
with that bit of 90Deg piece of bent sheet metal they
pass off as a diff brace.
How many times previously has someone said what
a bugger they are to fit.
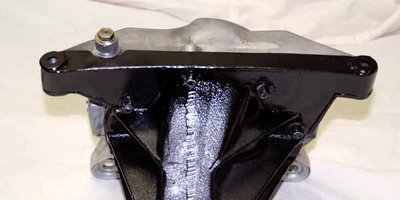
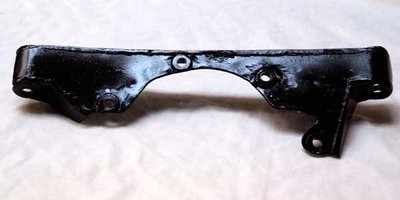
Take a close look at the integral diff and brace design
below... once it's fabricated and fitted to the diff the
whole diff unit can be removed and re-installed with
ease... no cussing.... or throwing things around... it slips
straight in.
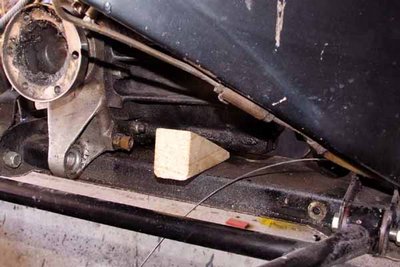
Here's a couple more diff removal tips, see the wooden
chock... make two of these and tap them in each
side of the diff... it will then just sit there in situ while
you undo all the bolts etc.
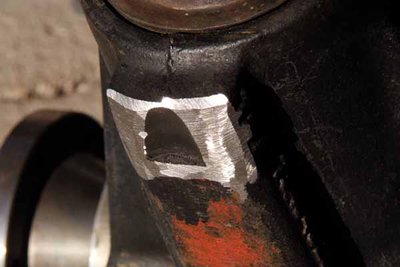
And note the other pic, part of the reason why the diff
is a cow to get out is where the underneath of the diff
nose fouls on the bottom tray, if you take to this section
with angle grinder and remove the offending metal,
plus a bit more right under the bottom lip of the rear
housing you will find the diff much much easier to jiggle
out, and put back in again.
No you wont hurt the diff by removing the metal.
they are built like the proverbial brick outhouse.
Oh, if you are wondering where to get the plans to build
the diff brace .. the measurements are right in front of
you, yep, just measure your own diff measurements, bolt
spacings and pitch circles and get to it.
Now, no more grumbling about diffs & strengthening
braces that don't fit!!
- ceejay
- Fourth Gear

- Posts: 558
- Joined: 27 Mar 2007
Just had my diff out for the umpteenth time, this time to replace a sheared drive shaft (with a pair of TT types  )
)
Always a bit of a struggle, with lots of swearing
I fitted the simple angle brace many years ago, but this one looks the business. Any chance of a pic from underneath, is there metal under the lugs as well ?
I'll have the grinder out next time too, why didn't I think of that !
(I saw a video in a very recent post, but can't find it now. )
)
Always a bit of a struggle, with lots of swearing
I fitted the simple angle brace many years ago, but this one looks the business. Any chance of a pic from underneath, is there metal under the lugs as well ?
I'll have the grinder out next time too, why didn't I think of that !
(I saw a video in a very recent post, but can't find it now.
68 Elan +2, 70 Elan +2s
-

Foxie - Coveted Fifth Gear

- Posts: 1210
- Joined: 20 Sep 2003
+1 with JonB, no problem removing diff with standard type brace and Spyder chassis.
Change is inevitable, except from a vending machine!
- Bigbaldybloke
- Fourth Gear

- Posts: 889
- Joined: 16 May 2017
It seems there is a difference between differential housings. My S2, with the small pinion flange was much easier to remove, as it does not have the fixture lump at the bottom of the nose. When I pulled the 3.77 from the Plus2, I had to take the grinder to the lump, and once done, it came right out. It may be a 3.9 thing, as I had picked up another 3.9 differential to covert to a 3.54, and it did not have the offending lump. Though it did have the larger diameter pinion flange. Both cars have their original chassis.
Rob Walker
26-4889
50-0315N
1964 Sabra GT
1964 Elva Mk4T Coupe (awaiting restoration)
1965 Ford Falcon Ranchero, 302,AOD,9",rack and pinion,disc,etc,etc,etc
1954 Nash Healey LeMans Coupe
Owning a Lotus will get you off the couch
26-4889
50-0315N
1964 Sabra GT
1964 Elva Mk4T Coupe (awaiting restoration)
1965 Ford Falcon Ranchero, 302,AOD,9",rack and pinion,disc,etc,etc,etc
1954 Nash Healey LeMans Coupe
Owning a Lotus will get you off the couch
- prezoom
- Coveted Fifth Gear

- Posts: 1192
- Joined: 16 Mar 2009
There is a very useful "YouTube" which may give some additional ideas:
https://www.youtube.com/watch?v=-12F0s58y6k&t=194s
The contributor is a forum member I believe.
https://www.youtube.com/watch?v=-12F0s58y6k&t=194s
The contributor is a forum member I believe.
1965 Lotus Elan S2 26/4022 (originally Dutchess Lotus East, PA and NJ Area, USA)
- Frogelan
- Fourth Gear

- Posts: 559
- Joined: 03 Jul 2017
William2 wrote:I was under the impression that when the standard diff brace is fitted you don't fit the large washers otherwise there won't be sufficient clearance under the diff.
I have a diff brace and the large washers in my Plus 2 spyder chassis.
There is still plenty of clearance underneath.
68 Elan +2, 70 Elan +2s
-

Foxie - Coveted Fifth Gear

- Posts: 1210
- Joined: 20 Sep 2003
Foxie wrote:
I fitted the simple angle brace many years ago, but this one looks the business. Any chance of a pic from underneath, is there metal under the lugs as well ?
I can see from the video on Frogelan's post above that the lugs are enclosed underneath as well.
68 Elan +2, 70 Elan +2s
-

Foxie - Coveted Fifth Gear

- Posts: 1210
- Joined: 20 Sep 2003
Picture of diff brace and washers, main thing is to ensure the bottom of the diff is a few millimetres clear of the chassis. I had to machine a few mm off the central tube through the lotocone to achieve this
Change is inevitable, except from a vending machine!
- Bigbaldybloke
- Fourth Gear

- Posts: 889
- Joined: 16 May 2017
Out of interest, we all seem to be fitting a diff brace when we fit cv drive shafts, but has anyone had a diff case fail in normal road use with cv shafts but no brace?
Change is inevitable, except from a vending machine!
- Bigbaldybloke
- Fourth Gear

- Posts: 889
- Joined: 16 May 2017
14 posts
• Page 1 of 1
Total Online:
Users browsing this forum: No registered users and 29 guests

