Restore Log - '68 Coupe
46 posts
• Page 1 of 4 • 1, 2, 3, 4
RESTORATION LOG
When I scan popular car forums out there I always come across "build logs" where car nuts document their projects. So I thought I'd do something similar here for the benefit of those to follow. This forum is great, but sometimes it sure is hard to find things in the search feature. Maybe having a collection of experiences in one place will help other restorers.
As my first real post I'm going to repeat the one I sent when I picked up the car, so sorry for those who have already read it. My intention is to make the car into a street legal racer that is legal with my local vintage racing group. Please dont tell me this is a waste of time; that I will never be competitive and such. If I keep it street legal I dont expect to be winning races with it. But that's ok, we have other cars for that (race.fawcettengineering.com). I may not even ever race it, but I want the choice. And I want to be able to drive it to local (local meaning within 300miles in Texas) car shows.
- mini64
- Second Gear

- Posts: 176
- Joined: 26 Aug 2005
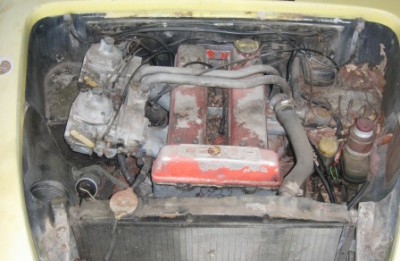
Just wanted to let you guys know last week my wife and I drove to north San Diego, from Bryan Texas, to pick up our new project. 3100 miles round trip with some site-seeing. The story is back in 1974 a friends kid, driving it home, accelerated hard from a stop over some RxR tracks and broke the ears on the diff (cracked open the bolt surrounds on the ears), and the car has sat ever since. Its all there as far as I can tell except the metal trim around the windshield, but with 36 years of weather damage. Supposedly rats or jack-rabbits ate away at the nice radiator opening hole in the front underneath. And I nearly found out the hard way what a black widow looks like! I?ll keep you guys updated on the restoration, and will of course have a thousand questions.
For now is there a wiring diagram available on the web somewhere? The ones in the two books I ordered are on their 8.5x11 pages and nearly unreadable. Also, is there a diagram on what the dash switches/lights/knobs do? My lettering is pretty much gone. Of course I?ll learn all this as I restore but right now on-lookers keep asking me what this and that does and I have no idea.
Yes, you guys have been helping me with twin cam questions for years, but that, I?ll admit now, was for our 7 racer.
- mini64
- Second Gear

- Posts: 176
- Joined: 26 Aug 2005
found a manual for download here, thanks!:
http://www.duartevelezgrilo.eu/lotuselan/
and then the wiring diagram here in our tech section:
http://www.lotuselan.net/uploads/elan_m ... wiring.pdf
http://www.duartevelezgrilo.eu/lotuselan/
and then the wiring diagram here in our tech section:
http://www.lotuselan.net/uploads/elan_m ... wiring.pdf
- mini64
- Second Gear

- Posts: 176
- Joined: 26 Aug 2005
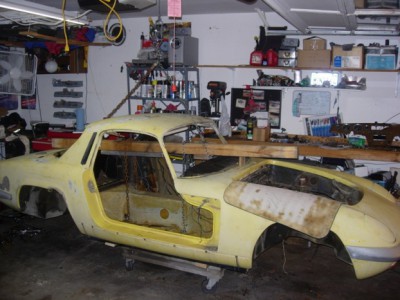
Thought I'd take the body off to ease access for the diff case repair. Also cause I've never done it before! Hopefully you can see here how I raised it with a hoist to my attic ceiling. Chained the 4x4 to body mount bobbins along the center tunnel, then chained that 4x4 over the roof to the hoist. Worked ok even though it is a bit unstable. Be sure to look for all the body to chassis spacer washers at each bolt location. some may be stuck to the body, some on the chassis. label which one went where. it may not go back the same but it will be a good start.
edit - for the reinstall of the body i replaced the 4x4 with a pipe with large washer welded on for all four chaing mount locations - made things more stable and allowed me to tilt and rock with body without worry of things slipping.
edit - for the reinstall of the body i replaced the 4x4 with a pipe with large washer welded on for all four chaing mount locations - made things more stable and allowed me to tilt and rock with body without worry of things slipping.
Last edited by mini64 on Thu Oct 10, 2013 8:14 pm, edited 2 times in total.
- mini64
- Second Gear

- Posts: 176
- Joined: 26 Aug 2005
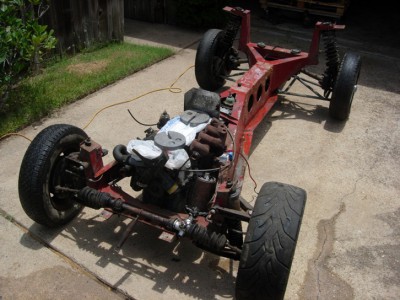
Back when I was young I saw a rolling chassis outside Sports Car World in Dallas. I thought someone built it up as some sort of demo. Didnt realize you could pull the body off in two hours and have this! Years later I looked at these chassis and thought "what a terrible design for a sports car chassis with regards to torsional rigidity!"
Not much rust - guess those hills above san diego are pretty dry. The head is off the motor as I couldnt get the bolts holding the headers to the down pipe seperated, so I removed the head to get at them a bit easier.
Note 3 of the 4 original tires still held air!
Not much rust - guess those hills above san diego are pretty dry. The head is off the motor as I couldnt get the bolts holding the headers to the down pipe seperated, so I removed the head to get at them a bit easier.
Note 3 of the 4 original tires still held air!
Last edited by mini64 on Fri Aug 20, 2010 3:21 am, edited 2 times in total.
- mini64
- Second Gear

- Posts: 176
- Joined: 26 Aug 2005
great explanation, with photos, on how the doors should be removed :
elan-f14/elan-door-removal-don-mess-with-the-inch-bolts-t19282.html
elan-f14/elan-door-removal-don-mess-with-the-inch-bolts-t19282.html
- mini64
- Second Gear

- Posts: 176
- Joined: 26 Aug 2005
Elan in kit form? The rear shocks couldnt even hold themselves up! Otherwise most things are in pretty good shape.
yes, that's a VTEC motor in the back ground. No, it isnt going in the Elan! Its for a future Mini build.
yes, that's a VTEC motor in the back ground. No, it isnt going in the Elan! Its for a future Mini build.
Last edited by mini64 on Mon Oct 07, 2013 4:23 pm, edited 1 time in total.
- mini64
- Second Gear

- Posts: 176
- Joined: 26 Aug 2005
deleted my photo of the diff housing with broken ears, but here it is repaired. I made up one of the brackets that goes across the diff ears and mounts to a pumpkin bolt, only I mounted to two of the bolts, using these plans:
lotus-gearbox-f37/differential-brace-t16852.html
lotus-gearbox-f37/differential-brace-t16852.html
Last edited by mini64 on Mon Oct 07, 2013 4:26 pm, edited 1 time in total.
- mini64
- Second Gear

- Posts: 176
- Joined: 26 Aug 2005
I did all the usual chassis modifications as can be seen in the tech library here, and at this post: post97201.html" onclick="window.open(this.href);return false;
and here: http://www.lotustalk.com/forums/f165/el ... ent-62179/" onclick="window.open(this.href);return false;
Like Jerry, I boxed in under the engine 'Y', although not as eloquent as his. Used 16 gauge throughout, except for the front jacking point reinforcement. Also added trailer tie-down loops to help with that trouble. I'll add tow hooks later. At the rear from the rear most body bolts. Have to decide at the front when I have the body back on and a larger radiator in.
Also put small gussets from the front shock towers down to the 'Y', At the rear where the little tubes go down for bragins I triangulated them in at the top and then just added some weld down at the bottom to tie them into the lower suspension arm fabrication. Hoepfully this will add some rigidity here. Just looks better to me - see first photo.
I appreciate the red paint on the original chassis, just dont like it. Used silver POR-15 on mine at the seams and rust points, then sprayed with a similar silver. Could have used black POR-15 but hate the darkness of black when working on cars. POR says the silver is not sunlight proof and has yellowed a bit just from the light coming through my garage windows.
Last edited by mini64 on Mon Oct 07, 2013 4:30 pm, edited 2 times in total.
- mini64
- Second Gear

- Posts: 176
- Joined: 26 Aug 2005
Moral victory - parts back on the car. Ok, they arent tight yet.
Using TTR suspension bits. http://www.tonythompsonracing.co.uk/mainframe.html
Using TTR suspension bits. http://www.tonythompsonracing.co.uk/mainframe.html
- mini64
- Second Gear

- Posts: 176
- Joined: 26 Aug 2005
Hi Mini64,
Your chassis 's looking good ... but
I noticed you used TTR parts for suspension , and it seems you're going to put some extra horses , so if you want to put a big bore exhaust manifold and now it's the right time for that mod ...
Christian.
Your chassis 's looking good ... but
I noticed you used TTR parts for suspension , and it seems you're going to put some extra horses , so if you want to put a big bore exhaust manifold and now it's the right time for that mod ...
Christian.

-

Old English White - Fourth Gear

- Posts: 585
- Joined: 12 Dec 2005
OK, its been umpteen months since I've posted on this thread as its been nearly that long since working on the coupe. Afraid we have too many other cars!
see here for a couple of our racers :
elan-racing-f12/eagles-canyon-raceway-all-lotus-front-rows-t22862.html
Finally spent a sporadic two months on the car, doing hydraulics, body work and roll cage. Updates to follow. Here is another silly photo of progress:
Unfortunately I'm having to stop again to get ready for the september races.
- mini64
- Second Gear

- Posts: 176
- Joined: 26 Aug 2005
46 posts
• Page 1 of 4 • 1, 2, 3, 4
Total Online:
Users browsing this forum: Ianashdown, marklowe and 24 guests


